Adding space to a vDisk on a PERC 5/i Controller Part 3 of 3

To Grow the C:\ Drive

This is part 3 of the “Adding space to a vDisk on a PERC 5/i Controller” post.

Back to Part 1 or Part 2.

Growing the system partition is a much more elaborate task. Download gparted (do not use 0.15.0, it’s buggy) and burn the ISO to disk. Make sure you have a full system backup before performing any disk modifications. Yes, that means YOU if this a production system.

Reboot the system with the gparted ISO in the drive. Press the enter key when you get to the boot screen. Follow remaining prompts to get you to the GUI. When asked which mode do you prefer, press 0 then enter.

gparted-1

  • Review the partitions and the familiarize yourself with your disk layout. Note which partition is the boot partition. For Windows, that is your C:\ drive. In this example, C:\ is /dev/sda2 and D:\ is inside the extended partition, /dev/sda5
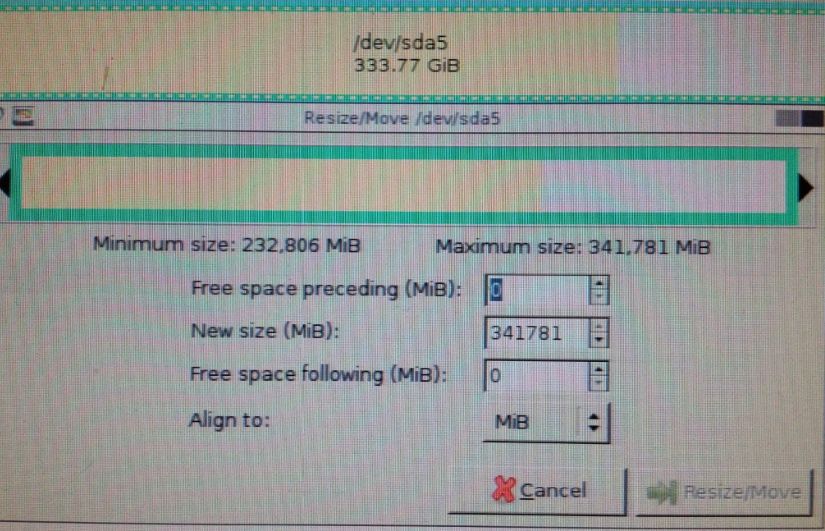
  • Now this is where it gets tricky. Here I shrunk the /dev/sda5 partition from the left to add space to the beginning of the partition. Then I shrunk /dev/sda3 (the extended partition). Lastly, I grew the C:\ drive partition, /dev/sda2.

gparted-resize

gparted-resize2

gparted-resize3

gparted-resize4

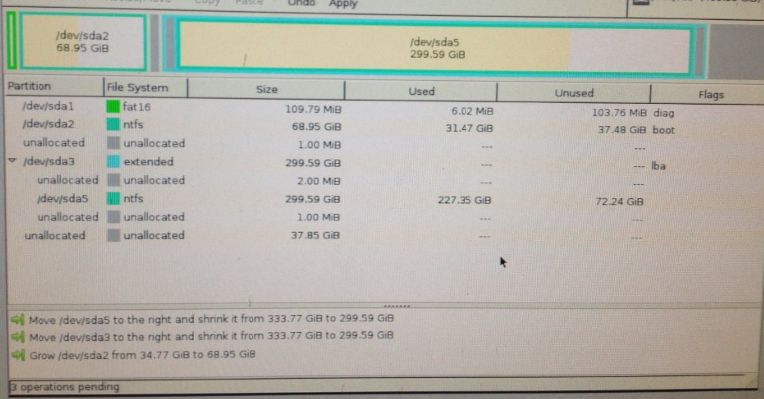
  • Notice the several unallocated slices between the partitions, these occur when you have cylinder aligned and MiB aligned partitions on the same disk. Also, notice the unallocated space at the end of the partition (like when we started) this will taken care of in Windows, however we could handle it hear, but it seems quicker to do from the OS.
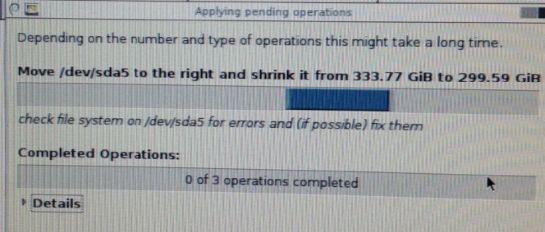
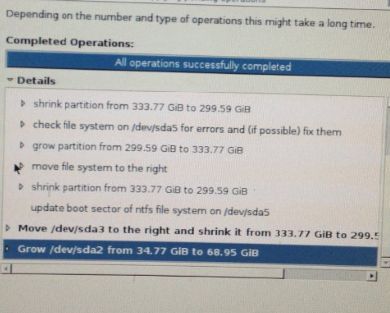
  • Once your partitions appear as you like them to, click Apply. This will queue up all 3 disk operations to disk. Depending on the size of your disk, this may take some time.
  • Click Details for more information about what’s happening.

gparted-apply

  • Once the operations are complete, click close.

gparted-done

  • Reboot the server and remove the CD.  Your system will run a check disk on C:\ (and maybe D:\). Let it complete and allow the system to boot to windows
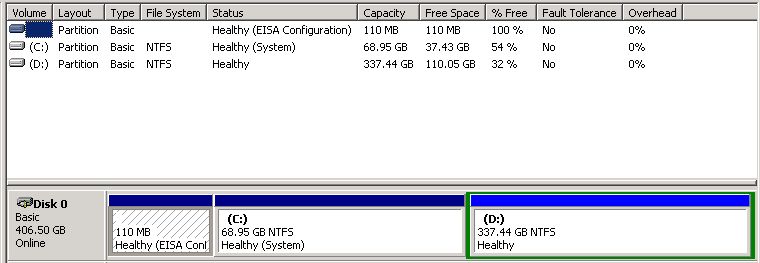
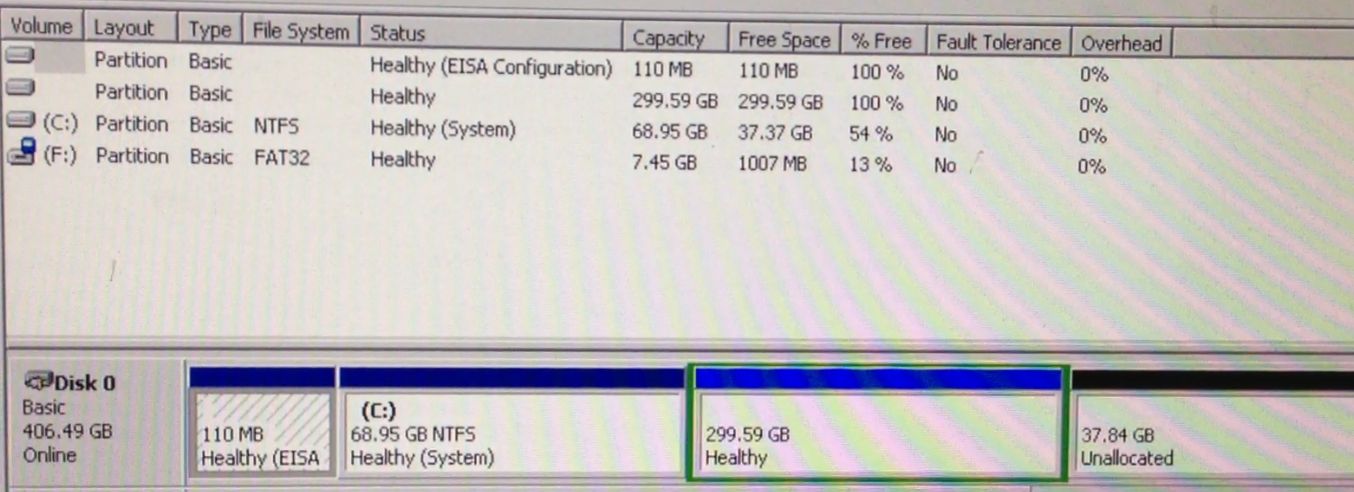
  • When your system boots up, open Disk Management and view the newly sized C:\ and D:\. Note the unallocated space still on the end of the drive. Also note, D:\ no longer has a drive letter. Reassign the same drive letter.

diskmgmt-unallocated3

  • Now Run dis part and extend the volume.
  • Enter #List DISK
  • Enter #LIST VOLUME
  • Enter #SELECT VOLUME #
  • Enter #EXTEND. This will take all available space and use it to extend the partition.
  • Reboot the server and allow for another check disk to run. This time it will be for the D:\ drive. Depending on the size of the drive, this may take some time.
  • Once the server reboots, open up disk management and review the disk layout.

diskmgmt-done

Adding AD Users and Computers to Windows 2008R2

I’m human. Someone asked me how to get to Active Directory Users and Computers (ADUC) on a 2008 R2 and my first response was, look under Administrative Tools.  Well, as luck would have it, it’s not there. Where is it, MMC? admintools? adminpak?  I wasn’t sure. This is a new server and not under my purview so I just assumed it was there.   Sometimes I think I’ve forgotten more that I remember, but then, It dawned on me, this is 2008R2 and EVERYTHING is either a role or a feature.

Problem

How to add Active Directory Users and Computers to a Windows 2008 R2 Server

Solution

  • Launch Server Manager
  • Click on/Expand Features
  • Click Add Features
  • Scroll down and expand Remote Server Administration Tools
    • Expand Role Administration Tools + AD DS and AD LDS Tools
    • Select AD DS Snap-Ins and Command-line Tools

    Add Remote Server Administration Tools

  • Click Next. Confirm installation selections and Click install.
  • Click Close when the installation succeeds.

aduc-installed


When powering on a VMA template- Cannot initialize property ‘vami.netmask0.vSphere_Management_Assistant…has no associated network protocol profile.

I’m new to 5.1 and I’m chugging along, getting my new cluster up and running. Deploying a template was a walk in the park in 4.1. This is where you find out you don’t know what you don’t know.

Problem

When I power on the VMA template I get this error:


VM Power-On Error

This is caused by not having created an IP Pool for your vAPPS. What is an IP Pool you say?  Here is an explanation from the vSphere 5.1 online documentation:

IP pools provide a network identity to vApps. An IP pool is a network configuration that is assigned to a network used by a vApp. The vApp can then leverage vCenter Server to automatically provide an IP configuration to its virtual machines.

Solution

You’ll have to configure an IP Pool in order to get your template powered on. Click on the Datacenter in vSphere client. There is a new tab called IP Pools, click on it to configure a pool.

IP Pool Tab

Click Add. The New IP Pools Properties box appears.  Give the pool a name. Depending on which version of IP you’re using, click on the corresponding tab.

New IP Pool Properties

Enter the subnet and gateway information as it pertains to your environment. I did not check Enable IP pool and you may or may not have to depending on your environment. Click on the DNS tab and configure DNS as needed. Go through the other tabs and configure them as they apply. Since I’m only using IPv4 without DHCP, it requires limited config. Click OK when you’re finish.

ippool-finish

You should now be able to power on your VMA template.

Similar information can be found here:


Social media & sharing icons powered by UltimatelySocial