Month: April 2018

Configure logrotate on a specific log file

There is a log file that I only want to keep 4 days worth of logs for.  Here is how you configure logrotate to rotate logs to your specific needs.

Logrotate is a system utility that rotates, compresses and mails system logs as needed on your Linux system.  Located in /etc on RHEL based systems, it has default parameters set for certain files, but also allows for you to chose your own files to be rotated, as needed. To configure /var/log/slapd to rotate logs daily and only keep them for 4 days, here are my steps.

Switch to root and vi /etc/logrotate.conf

~ ] # vi /etc/logrotate.conf

At the bottom of the file, there is a section where system-specific logs can be configured for rotation. G$ to get to the end of the file and i for insert. Make a new line and enter the path to the file with opening and closing bracket to  place your rotation parameters.

Screenhost of logrotate.conf

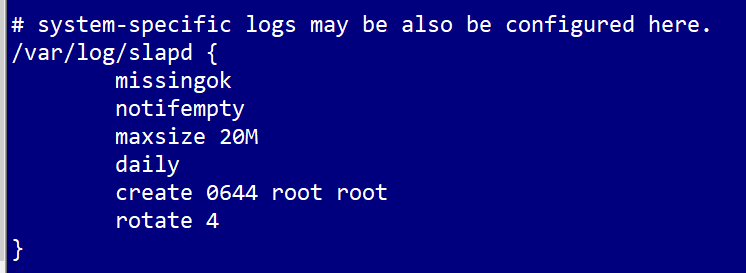
  • missingok means that if the file is missing, go to the next one and don’t throw an error.
  • notifempty means that the file shouldn’t be rotated if it’s empty.
  • maxsize is the max size the file can get before it’s rotated. 20M is the size of the file in megabytes.
  • daily means the log file will be rotated every day.
  • create  0644 root root means that log file that is rotated, a file will be created with 0644 mode set on the file. The owner and group on the rotated file will be root.
  • rotate 4 means that the log will be rotated 4 times before it’s removed from the system.

Close the file, :wq! and run logrotate to see if it’s working.

~ ] # logrotate -v /etc/logrotate.conf

I used the -v switch to see the verbose output of the command.

Output of running logrotate

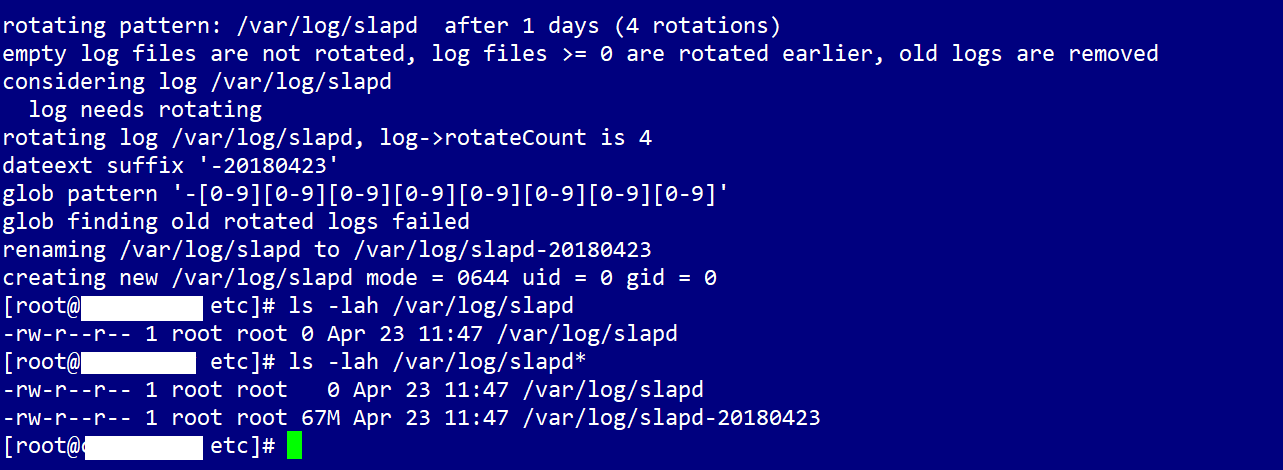
The output tells you what is happening during the running of the command. It runs against the slapd file and lists the rotation schedule, then says it won’t run against empty files and that old log files will be removed. The file is rotated and a suffix is appended to the old log file. It lists the glob pattern (it resembles regular expressions, but much simpler ) and looks for old files to delete. As you can see, there were none.The file is renamed and a new file is created with the mode you stated. I list the files and as you can see, the file has been rotated and a new, blank is ready for the days logs.

The man pages for logrotate and logrotate.conf are very helpful in this case. Be sure to read them to see how many options you can use to configure your logs to rotate.


Assigning Registered Domain Name to Lightsail Server

There are a few prerequisites to assigning a domain name to a Lightsail instance.

  1. You must have a domain name registered with a provider of your choice.
  2. A running Lightsail server
  3. Static IP assigned to your server.

Assign Static IP to Lighsail server

Log into the Lightsail Console and click on the Networking Tab

Lightsail Console- Instance Tab

Click Create static IP

Lightsail Console-Create Static IP

Select your static IP location. Note, you must already have an instance running in that region in order to attach a static IP to it.

Lightsail Console-Select IP Region

Select the instance that you’re assigning the static IP to from the drop down box. Give your static IP an unique, recognizable name. Click create.

Lightsail Console-Attach to an instance

Once you’ve clicked create, your IP will have a pin next to it, noting that is it attached to the instance.

Lightsail Console- Pinned Static IP

Assign DNS Zone to Lightsail server

Click on the HOME menu at the top of the page. Click on Networking > Create DNS zone

Lightsail Console-Home button

Lightsail Console-Create DNS Zone

Enter your domain name and click Create DNS Zone.

Lightsail Console-Enter Domain Name into DNS Zone

Click Add Record:

Lightsail Console- Add A Record

Lightsail Console- Add A Record and Domain Name


Add an A record:

Make sure the Type is A. Click in the subdomain box and enter www.yourdomain.com .

In the destination IP box, select your Static IP name and click save.

Nameservers:

You will be given a list of name servers to point your domain to.  I’m using Hover and here is how I point my domain to my Lightsail server.

Log into your  Hover account and on the overview tab, scroll down to nameservers and click edit.

Hover Console- Tabs

Hover Nameservers

Enter the name servers give to you in the DNS records tab in your Lightsail console. You must add at least two. Add additional nameservers by clicking the plus sign. When you’re done. Click Save Nameservers.

Hover- Edit Nameservers

Edit DNS Records:

Click on the DNS tab and review your current DNS settings. Click edit next to the A (*) record and enter the static IP or your Lightsail server.

Hover Console - DNS Records

Hover- Edit DNS Records

Click Save Changes and repeat for the A(@) record.

Test your changes by entering your domain name into a browser to see if your website loads.

If it doesn’t load immediately, be patient. It can take anywhere from 24-48 hours for DNS to propagate.


WordPress on AWS

I was invited to Philly ‘burbs WordPress meetup to give a talk about how to install WP on AWS. I’d given this talk before in an impromptu setting, my dining room table, to my monthly coding group. It was more of a workshop, really hands on and at the end, everyone was a command-line hero in my book. Most, never having logged into a Linux server before, let alone deploying a server in the cloud.

Woman gesturing at Screen
Photo Cred: @accessamy

Liam, the group leader, saw a tweet about it and invited me to present it to his group. Here are the videos and the slide deck from the MeetUp.

WordPress on AWS Part 1:
https://youtu.be/e3GaqR0r7Os
WordPress on AWS Part 2
https://youtu.be/CCZPKvHvYlU
WordPress on AWS Part 3
https://youtu.be/ksVu2YbMLeg
Slides:
https://bit.ly/2qkuvEN


Social media & sharing icons powered by UltimatelySocial