Category: vmware

When you resize the wrong hard disk on a vm

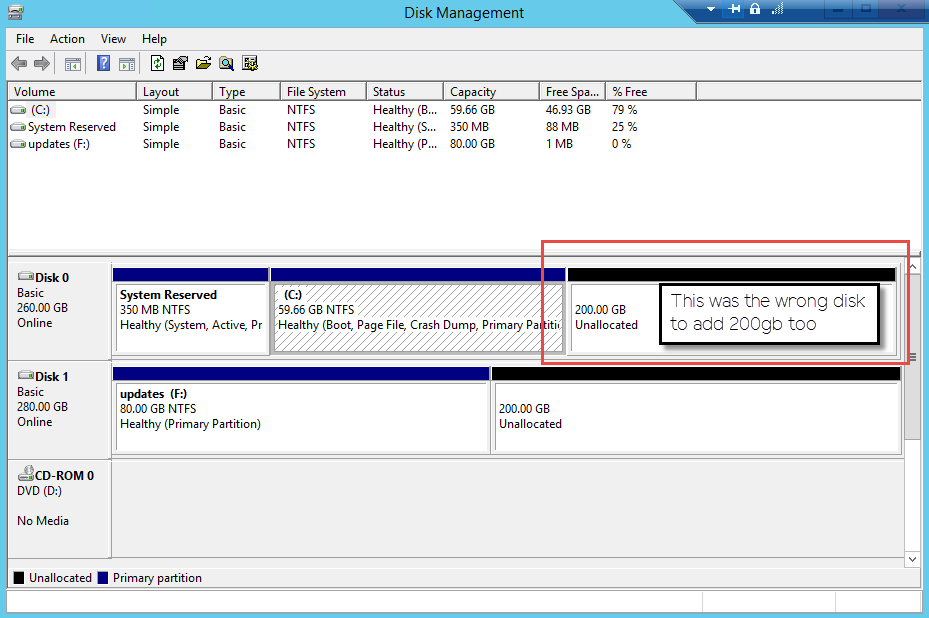
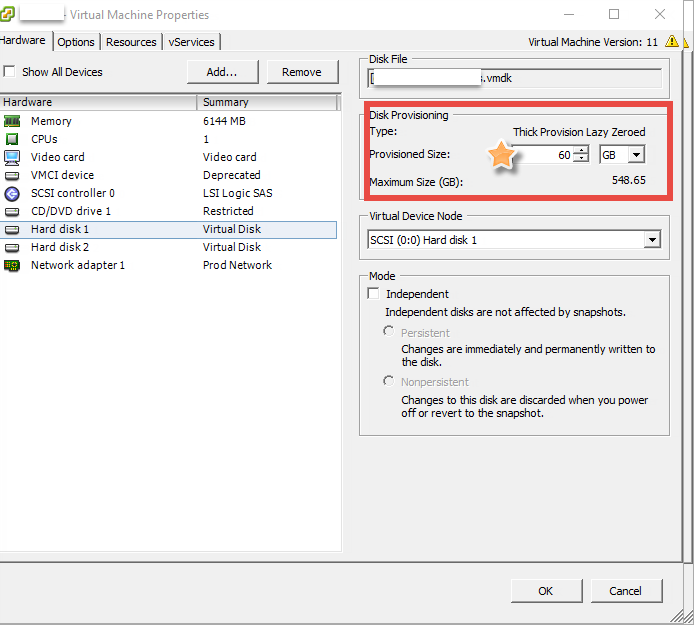
I’m running WSUS on a 2012R2 server and the drive where the updates are tends to grow a lot. On this VM, I increased the provisioned size of the c:\ drive and not the  drive where the updates reside. I didn’t notice I’d touched the wrong disk until I’d rescanned the disks on the VM and saw what I’d done.

260gbdrive


As panic set in, I changed the provisioned size back to 60GB (I know, I know) and well, you know the rest. This article saved me today. I didn’t want to restore the VM unless I really had no choice, this did the trick.

wrongdisk

Power off the VM and identify the host & datastore that the VM resided on, I enabled SSH and browsed to the VM location.

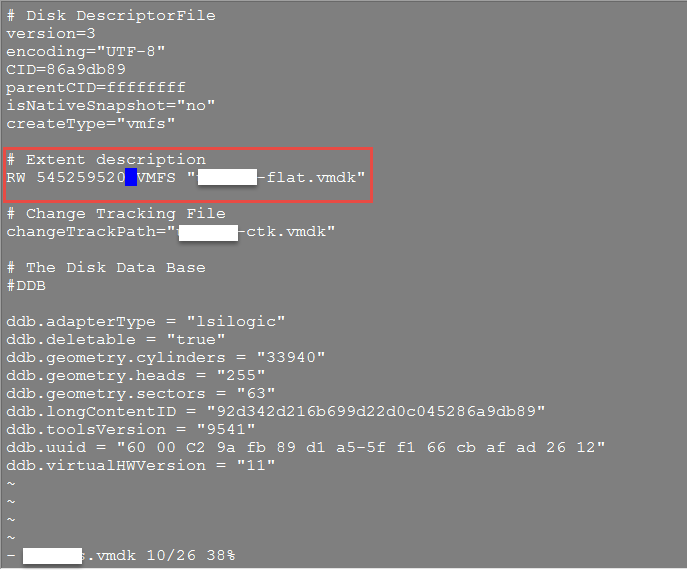
Cat out the descriptor file  (vmname.vmdk) that outlines the data layout on the virtual disk. In the Extend Description section, you’ll see the extent(s) info. Next to RW (if it’s read/write) a number. That number represents the size of the vmdk in sectors, with the additional 200GB included.

extentsize

To change the sector size to reflect the value I’m shrinking the drive back down to, 60GB, calculate it:

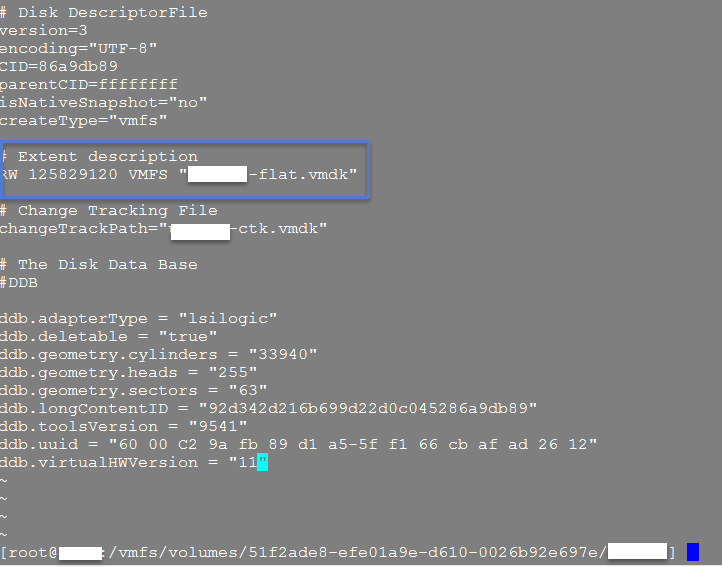
60GB = 60 * 1024 * 1024 * 1024 / 512 = 125829120 sectors

Edit the descriptor file and change the sectors to the new number, save and exit.

newsectorsize.png

Come out of the directory where the VM resides and VMotion  it to another datastore. Review the settings of the vm and take note of the new and improved disk size.

newsize.png

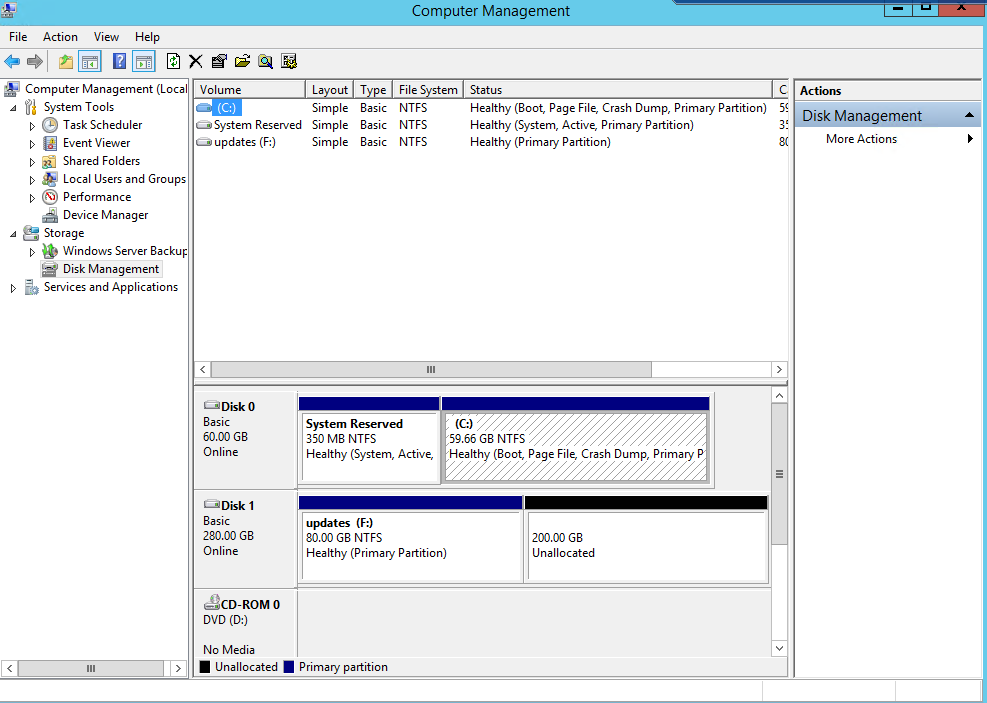
Power on the VM and review the size in Disk Management.

diskmgnt

Now, grow the right disk and try not to ever do that again.


Deprecated VMFS volumes found on the host Warning on ESXi after adding a datastore with Dell VSM

I’m running ESXi version 6.1 U1 and Dell Virtual Storage Manager  (VSM)version 4.5.2.974. I added a datastore to  the cluster using VSM and on 2 of my hosts I got the following alert:

vsmversion

deprecatedvmfs

Enables SSH on the host and check out the logs.

In /var/log/hostd.log , I found the error:


 warning hostd[xXxXxX] [Originator@6876 sub=Hostsvc.DatastoreSystem opID=123456-789-abc-def user=vpxuser] UpdateConfigIssues: Deprecated VMFS filesystems detected. These volumes should be upgraded to the latest version.

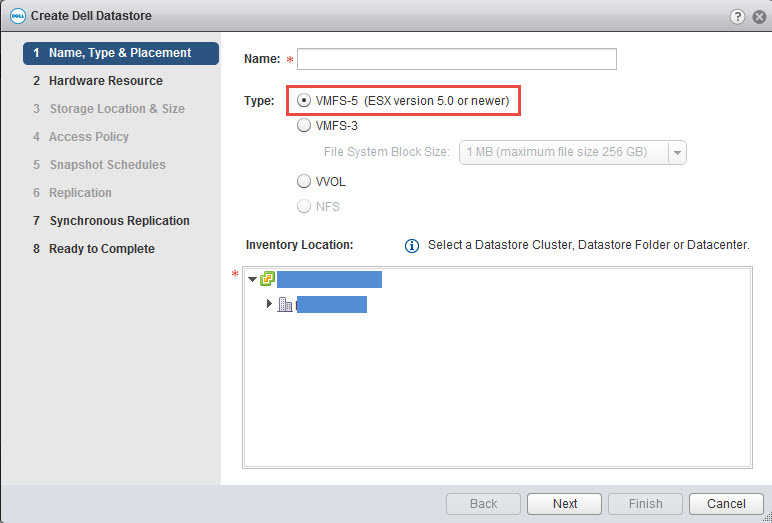
When I created the datastore, I did select VMFS 5, so I wasn’t sure why this error appeared.

selectedvmfs5

According to vmware KB2109735, this is a known issue in version 6.0 and there is no resolution. Just restart the management services and the message goes away.


#  /etc/init.d/hostd restart
#  /etc/init.d/vpxa restart

Then the message goes away.


*note*

This only happens to me when I create a datastore with VSM. If I present a disk from my array, set up the iSCSI connections and rescan, I don’t get this message. Your mileage may vary.

VDP backup fails due to error consolidating disks on VM

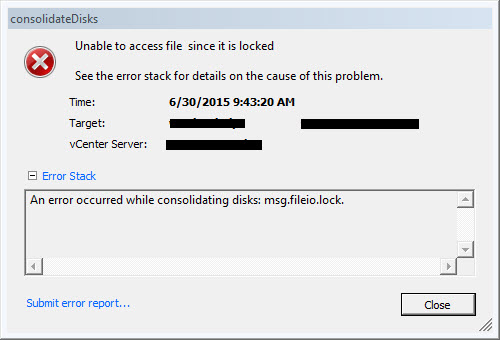
We are running VDP 5.8 on vSphere 5.5. One of the appliances failed to backup a VM last night. Checking the VM in the client, there is a message to consolidate the disks. I attempt to consolidate by right-clicking on the VM > Snapshot > Consolidate and it failed with this error:
locked

I checked the vmware.log file for the VM and saw this error:
2015-09-15T03:00:29.146Z| vcpu-0| I120: DISK: Failed to open disk for consolidate '/vmfs/volumes/5490a09a-eb6682ee-affb-bc305bef5520/mobxxxxxx/mobxxxxxx-000002.vmdk' : Failed to lock the file (16392) 8162

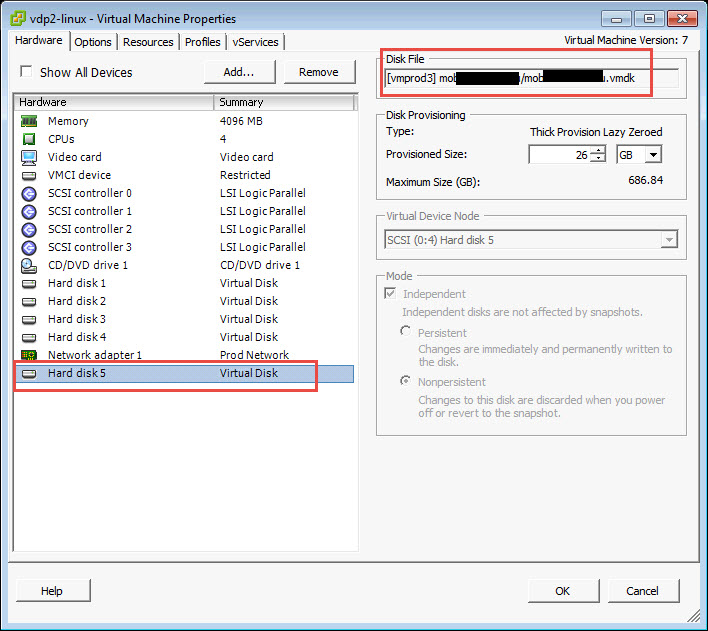
I check the settings on the VDP appliance and notice that the VMDK that belongs to the vm is attached.

extra-vdp-disk

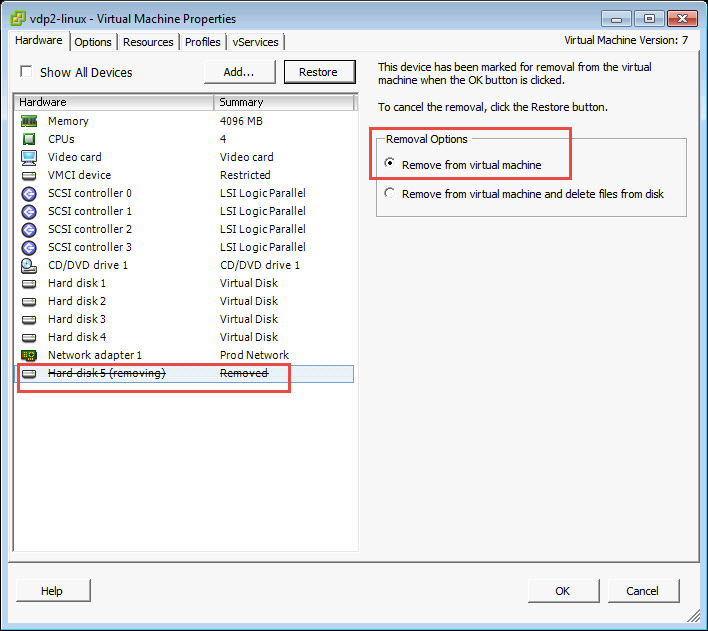
Shut down the VDP appliance and remove the disk. Making sure to only remove from virtual machine and NOT remove from virtual machine and delete files from disk.

remove-extra-vdp-disk

Run the consolidation and if it succeeds, re-run the VDP backup on out of date sources to remediate your failed backup.

BSOD on a Windows VM bugcheck code 24

A VM that is running Windows 2008 R2 has experienced a BSOD. The application owner notified me and sent me some useful information.

Problem signature:
Problem Event Name: BlueScreen
OS Version: 6.1.7601.2.1.0.400.8
Locale ID: 1033
Additional information about the problem:
BCCode: 24
BCP1: 00000000001904FB
BCP2: FFFFF88006C34E28
BCP3: FFFFF88006C34680
BCP4: FFFFF880014E81B2
OS Version: 6_1_7601
Service Pack: 1_0
Product: 400_3
Files that help describe the problem:
C:\Windows\Minidump50415-20202-01.dmp
C:\Users\servername\AppData\Local\Temp\WER-42663418-0.sysdata.xml
Read our privacy statement online:
http://go.microsoft.com/fwlink/?linkid=104288&clcid=0x0409
If the online privacy statement is not available, please read our privacy statement offline:
C:\Windows\system32\en-US\erofflps.txt

 Good info here, but with all BSODs, you should look at the dump file for more definitive information.

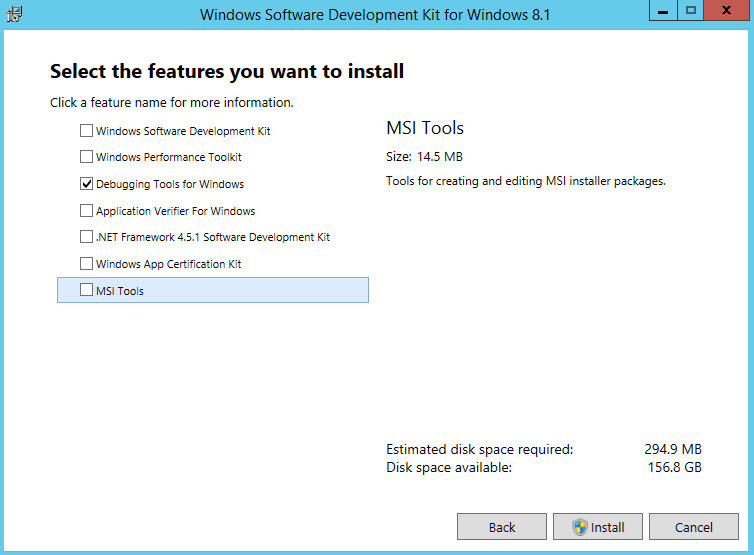
I grabbed the dump file, and downloaded Windows SDK. During the install, I unchecked all the boxes except the Debugging Tools for Windows and installed.

Features to Install

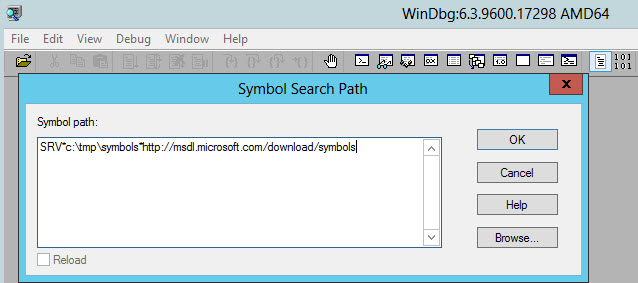
Launch WinDGB (x64) as administrator. The first step is to configure the symbol file path. It can be any folder on your server, just create an empty one and go to File > Symbol File Path.

In the symbol search path, I entered the following and clicked OK.

SRV*c:\tmp\symbols*http://msdl.microsoft.com/download/symbols

Symbol Search Path

Save the workspace. File > Save Workspace

Opened the dump file. File > Open Crash Dump.

Open Dump File

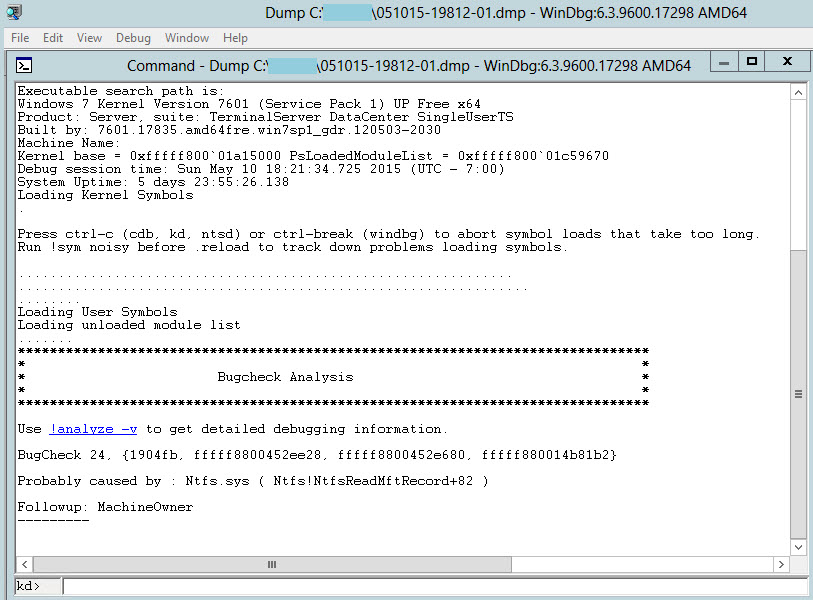
Before you proceed, read the info under the bugcheck analysis. It tells you what probably caused the error.

NTFS.sys

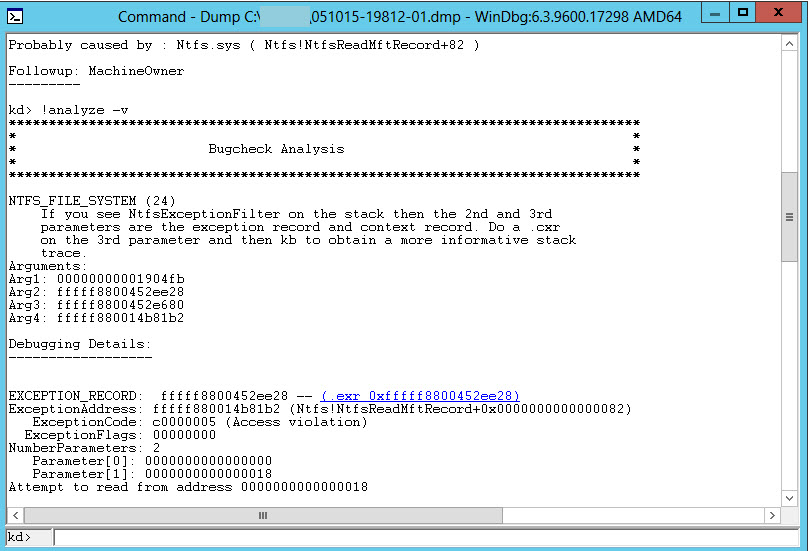
Click the link in the Bugcheck Analysis section, !analyze -y to get more information.

Read through the info. Note the following:

  • Process Name
  • Bugcheck_str
  • Image Name
  • Area right above the debugging details

At the very top you’ll see a message and some arguments.

Analyze

At the kd> prompt at the bottom of the debugger, enter

.bugcheck

Bugcheck command

In the analysis you see the Arguments. Do a .cxr on the 3rd argument as it suggests.

arguments

.cxr fffff88004523680

CXR command

CXR output

Next,

Run the kb command for a more informative stack trace.

Run KB command

There are now a few pieces of information to hone in on.

  1. The bug check code
  2. The stack track text

Look up the bugcheck code here on the msdn bug check code reference page.

https://msdn.microsoft.com/en-us/library/windows/hardware/hh994433%28v=vs.85%29.aspx

Google the stack trace text and this vmware KB article # 2115997 comes up.

http://kb.vmware.com/selfservice/microsites/search.do?language=en_US&cmd=displayKC&externalId=2115997

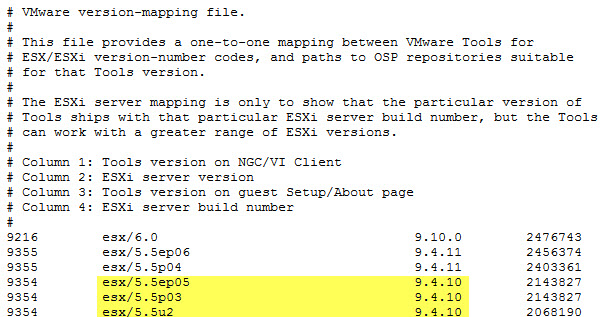
This appears to be a known issue with a few versions of vmware tools:

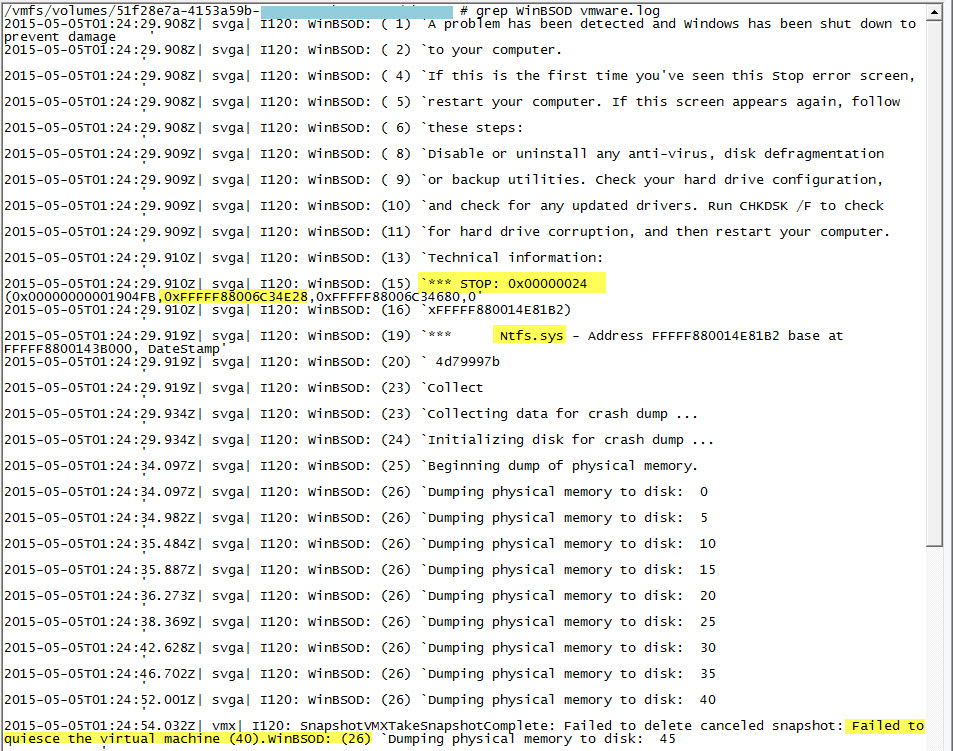
I looked in the vmware.log file for the entries mentioned and they matched.

vmware-logs

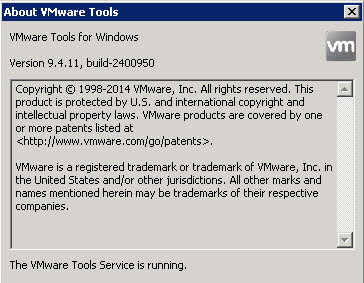
The image name on the dump file referenced vds.exe and this VM is running tools version 9.4.11. This issue only appeared since the tools upgrade when we upgraded to 5.5 Patch 4

To confirm what version of tools you’re running, go to the VM and in the notifications bar, right click on the icon and select About  VMware Tools

VMware Tools version

Time to downgrade tools.

Find the tools ISO that will have a version that is not listed in the KB, but one that is compatible with your version of vsphere.

http://kb.vmware.com/selfservice/microsites/search.do?language=en_US&cmd=displayKC&externalId=1036810

https://packages.vmware.com/tools/versions

Search for your current version and find the one closest to it that is not affected with this issue.

Version of tools to downgrade to

You’ll have to uninstall the current version of tools before installing older version. It will require a reboot.

The hardware version will not be an issue with this versions of tools, but confirm that for your specific environment.

Coming down off my VMworld high

This is my 3rd year attending VMworld and each time I walk away with a renewed focus and energy for my virtual infrastructure and what I can do to better manage and improve it. As I’m writing this post, I’m scrolling through my tweets and notes from VMworld and what stands out is that for my organization, VMware has the tools an SMB needs to deploy, monitor, upgrade, backup, administer, BD/DR, and grow its virtual infrastructure with ease.

My schedule was filled with sessions that covered just the things I needed to hear and to use day-one when I’m back in the office. Using the schedule builder as soon as it was available gave me time to make smarter choices and decide where my time should be spent in a more efficient manner. The VMworld app was a life saver! I knew right where I was suppose to be with notification turned on. The social media section keep me abreast of all the #vmworld tweets easily.

Here are my 3 favorite sessions. The sessions that made me want to roll up my sleeves the minute I had a WiFi connection to VPN back into the office and ‘test’ something out.

Here are my top 3 all-around favs from VMworld 2014:

  • The Solutions Exchange Welcome Reception
    • I got to spend a lot of time looking at what vendors are bringing to the virtualization space. Software, products and services that are moving VMware forward as the leader.
    • The Games at the CDW booth were more fun than I expected to have on opening day. The trivia questions were thought provoking and the ‘game show host’ and his assistant really kept us laughing.
    • Free beer & wine.
  • Winning a scooter (razor type) from Ravello and terrorizing the Moscone Center.
  • Taking a selfie with my SRM mentor, Mike Laverick of VMware.
Me and Mike Laverick of VMware

Here are a few things I would change for next year:

  • The volume of the music at the Monday General Session was deafening. I really didn’t understand why the AV people didn’t rectify that by the end of the keynote. I promised myself I wouldn’t listen to another GS in the Hall D. The hang space was just fine.
  • I was in just ONE session with a woman speaker and I think she was a vendor. ‘Nuff said.
  • I know they’re trying to accommodate those with dietary restrictions, but vegetarians do need protein too.

Now that I’m back in the office, I’m ready to, upgrade to vSphere 5.5, tweak SRM  and  test out the vSphere 6.0 beta. I can’t talk about it (NDA), but you can find out more about it here.

Looking forward to next year.


Updating Java to 1.7 Breaks Dell EqualLogic VSM

I loathe updating Java because you never know what it will break. This morning, it was the Dell EqualLogic VSM plug-in for vCenter.

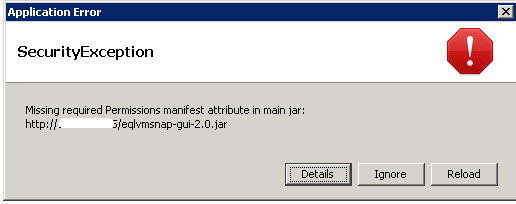
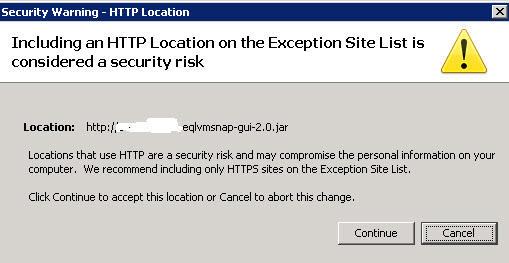
Upon launching the plug-in, I got these errors:

Image

Image

I thought to disable the current version and enable the previous version, but there is a way to add this URL as an exception.

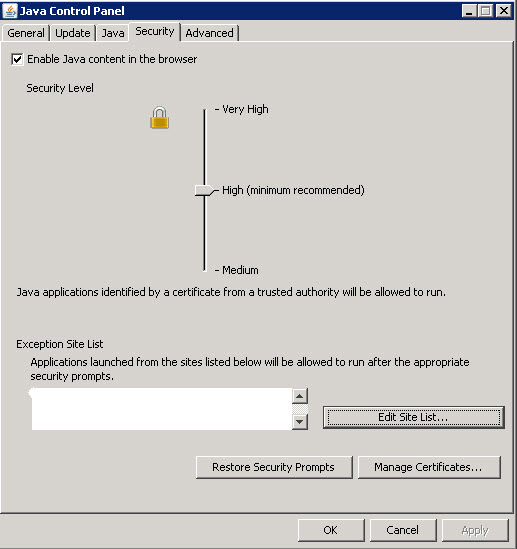
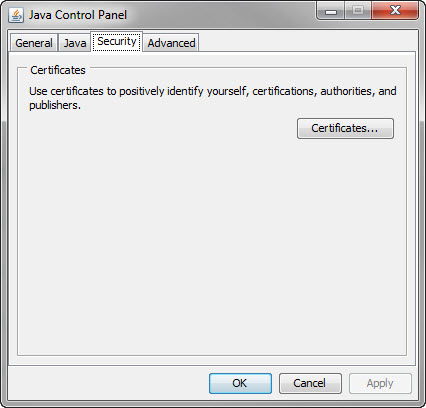
Launch the Java control panel (I’m running 2008 R2) and click on the security tab.

Click the edit Site List button:

Image

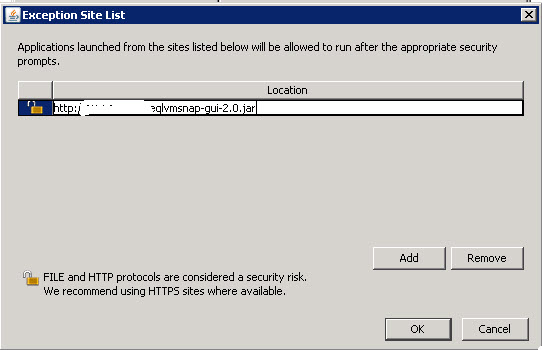
Add the URL in the above mentioned error, by clicking Add, then typing in the URL.I also added the IP to vcenter as well. Click OK.

Image

Image

One more warning about the HTTP location you’ve entered. Just click continue. Apply the changes and close the java applet. Be sure to close the vCenter client as well.

Launch the client and log into VSM as usual.

Update- info on Windows 7

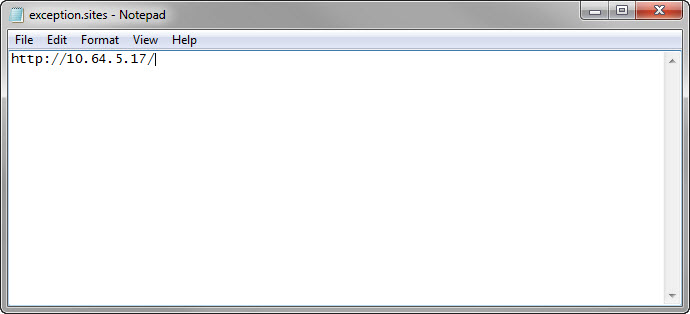
In Windows 7, there is no exception list under the security tab. To add your site to an exception list, you can create an exception.sites file and add the URL.

win7-java-securitytab

Browse to this location: C:\Users\username\AppData\LocalLow\Sun\Java\Deployment\security

If  there is a file named exception.sites, add the URL to that file. One URL per line.

If not, you can create it and add your URL.

exception-site


The command has timed out as the remote server is taking too long

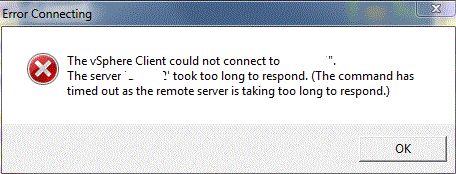
I’m running vSphere 5.1 and I can’t launch the vSphere Client. I am able to launch the web client just fine. Upon launching the fat client, I get an error:

vsphere client could not connect

We updated our domain from 2003 to 2008 R2 and replaced all old domain controllers  (DCs). I’d changed the primary and secondary server URL (there was no port number previously) during the cut over and all has been working well for the past 26 days and today, nothing.

I logged into the web client as admin@system-domain to confirm I was pointing to the new domain controllers and I was. So now I’m really stumped. KB article 203918 solved the riddle.

Web client login as admin

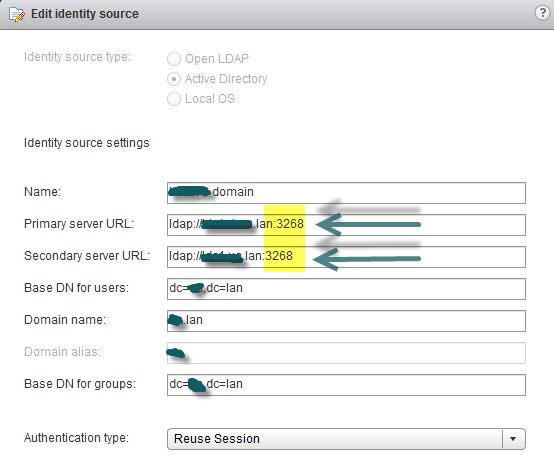
To view the identity sources:  Administration > Sign-On and Discovery > Configuration. Here you can view the identity sources. Click the pencil to edit and see more detail.

Edit Identity Sources

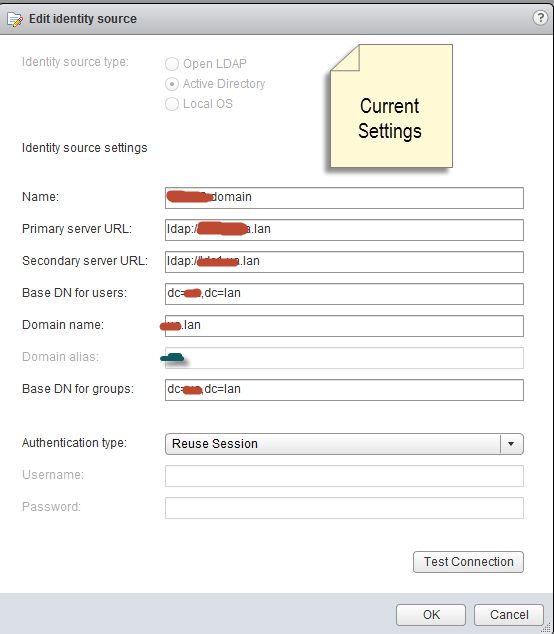
Here are my current settings:

Current Server URL

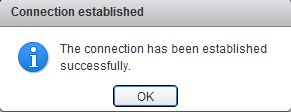
I added the port number to both the primary and secondary server URLs and tested the connection. Click OK to close the dialog box.

Updated URL with Port Number

test-success

I was then able to launch the fat client without error.

Don’t forget to log out of the web client as admin@system-domain.

It’s safe to assume when I installed 5.1, I didn’t enter the port number as suggested in the Configuring vCenter Single Sign on doc and it worked just fine. Upon upgrading, the port became a required setting.

Configure and Install the Multipath Extension Module for vSphere and EqualLogic

The MEM (Multipath Extension Module)  by EqualLogic (EQL) handles path selection and load balancing to the storage array. Upon install, it will add another path selection policy called ‘dell_psp_eql_routed’ in addition to the 3 default policies. Using this PSP is ideal when you’re datastores reside on EQL since the module is written by EQL, it has been designed to perform more efficiently in regards to path selection and load balancing to the array.

Here is how I installed and configured MEM on my esxi hosts. I’m running ESXi 5.1 Update 1 with vSphere CLI installed on vCenter.

Prerequisite: Be sure to configure an iSCSI vSwitch for multipathing before installing MEM. Please read  TR1075 for more information on how to configure the vSwitch.

Download MEM from EQL support site. Login is required. Review the release notes, TR1074 as well as the installation & user guide before proceeding.

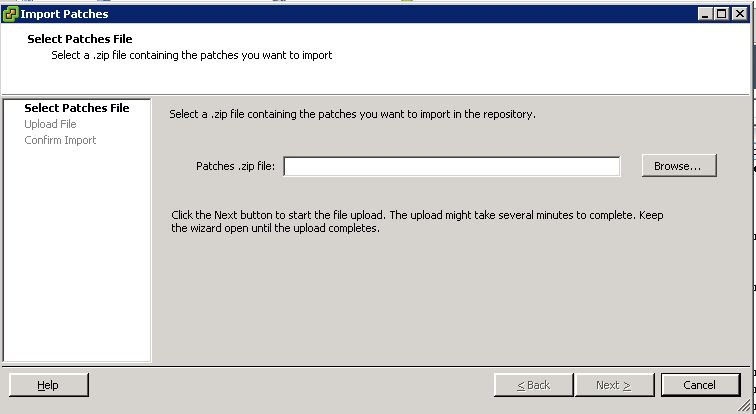
On the vCenter server,  launch vCenter client. From the home screen, open Update Manager and click on the patch repository tab. Click import patches and browse to the MEM offline bundle zip  and click next to upload.

import-mem-offline-bundle

browse-mem

upload-mem

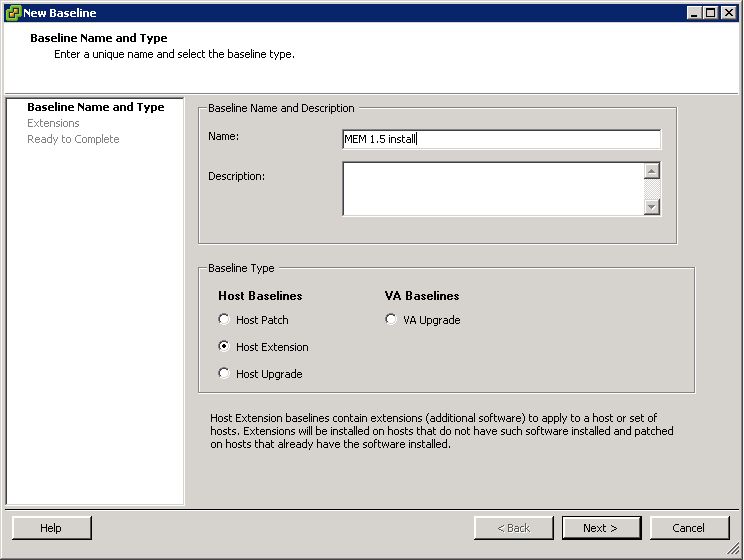
Next, create a baseline. Enter a name and description for your new baseline, select ‘Host Extension’ then click next.
newbaseline1

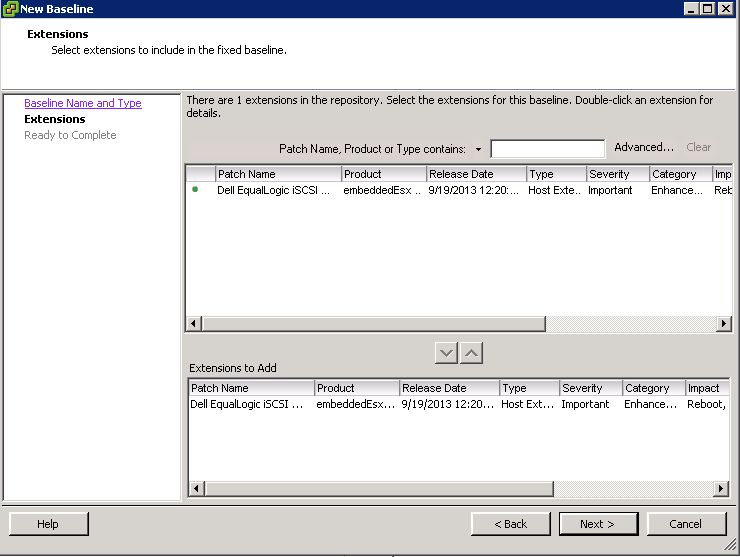
Add the extension to the baseline. Click next.
newbaseline2

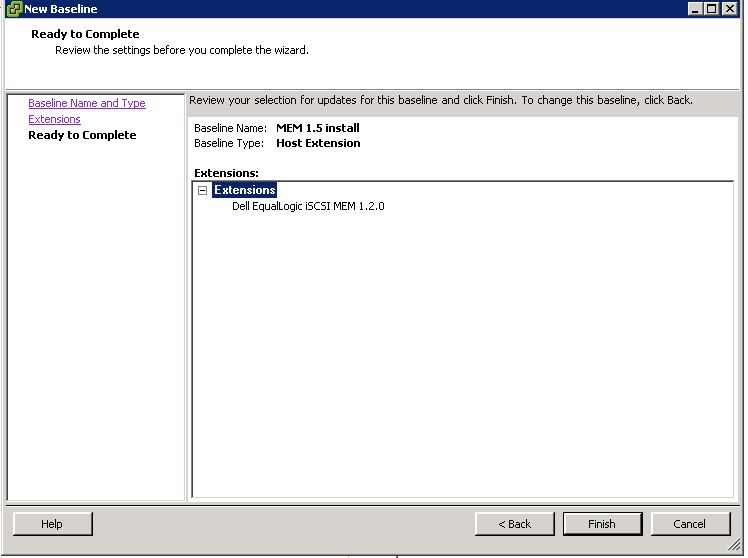
Review your  setting and click finish.
newbaseline3

Your newly created baseline is now listed under the Baselines and Groups tab.
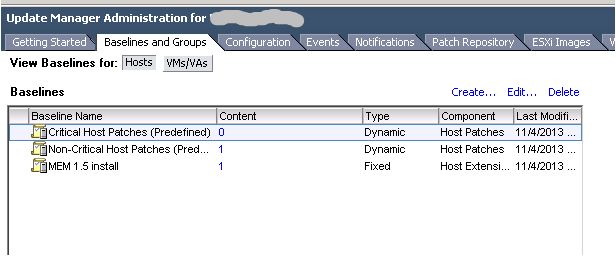
baseline-and-groups

Now it’s time to install. Begin by putting your host into maintenance mode.Click the update manager tab of the host and click attach.
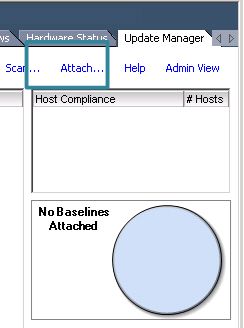
attachbaseline

Check the box next to the MEM install and click attach.
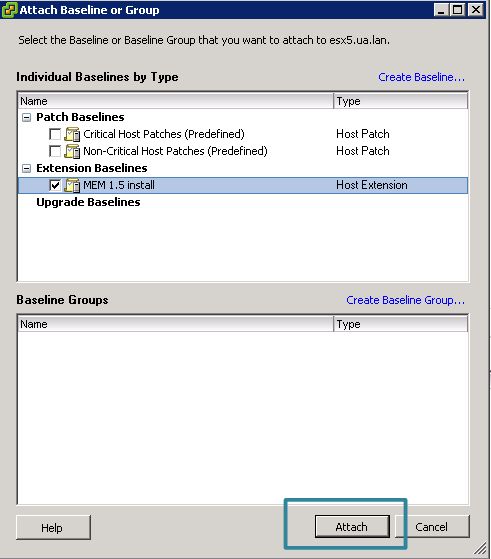
attachbaseline2

Highlight the attached baseline and click scan.
scanhost

Confirm that you’re scanning for patches and extensions. Remove the check next to upgrades. Click scan.
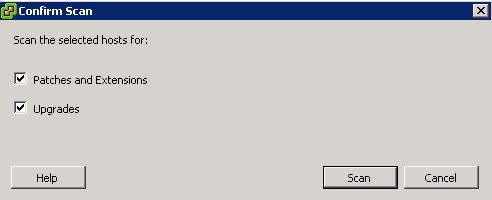
confirmscan

The host will now be labeled as non-compliant. Click remediate in the lower right corner.
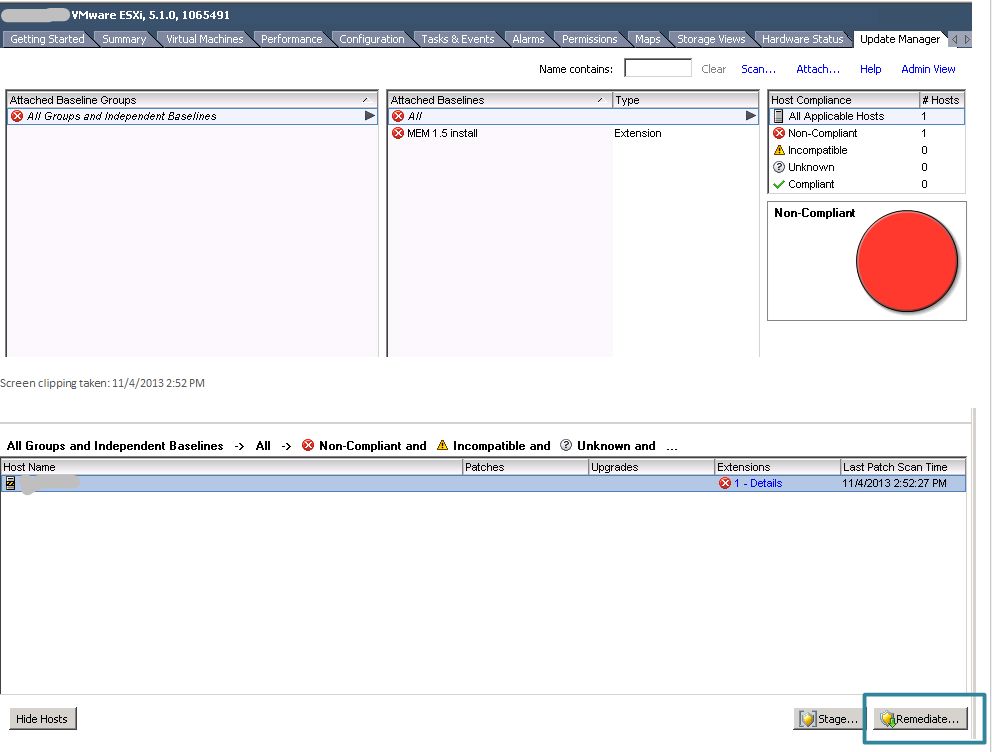
remediate

Click next twice in the remediate wizard if you’re accepting the defaults. On the schedule window, type in a new task name and description (optional) and select a remediation time. I did mine immediately, but this task can be scheduled for a later time. Click next.
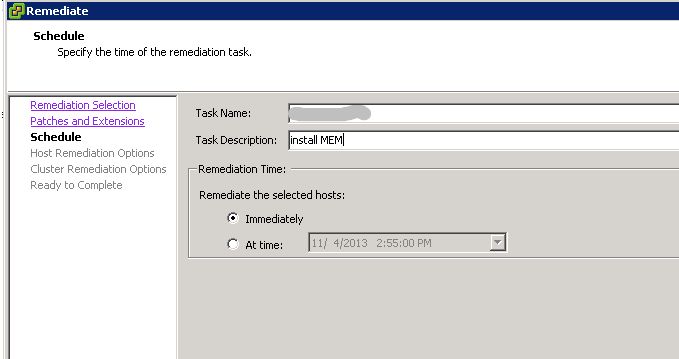
remediate-sched

Edit any host remediation options and click next. Edit any cluster remediation options and click next. Review your remediation settings and click finish.
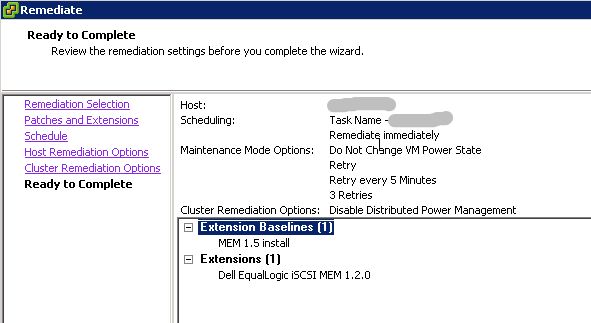
review-remediate

Monitor the recent tasks pane to see the status of the installation. Upon completion, the host will be listed as compliant in the update manager tab.
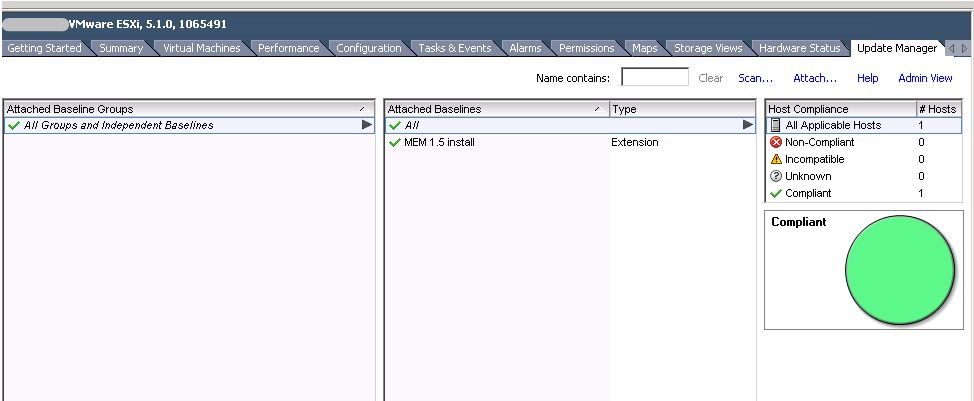
compliant


Reboot.

From a system with vMware vSphere CLI installed on it, run the following command to verify the MEM installation. You will need the setup.pl script in order to run it. It’s included in the MEM download.

Enter the following command using your esxi hostname or IP:
# setup.pl --server=esxhostname_or_IP --query

Enter the credentials for the host. After a few moments, the command will display the version of the MEM installed, the default PSP that is now set as well as the vmkernal ports used by MEM.
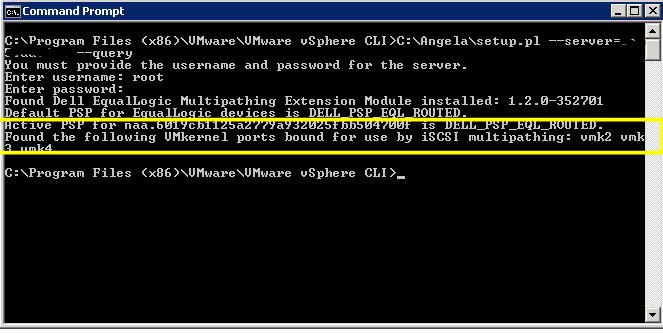
verifymem

To list the new Dell EQL PSP as well as the defaults, use the following command:

# esxcli --server esxhostname_or_IP storage nmp psp list

Enter the credentials for the host.
listpsps

Multipathing is available immediately after installation. You can see the paths to the disk as well as the new PSP. On the host, go to the configuration tab+ hardware+storage+right-click the datastore + properties+ managed paths.
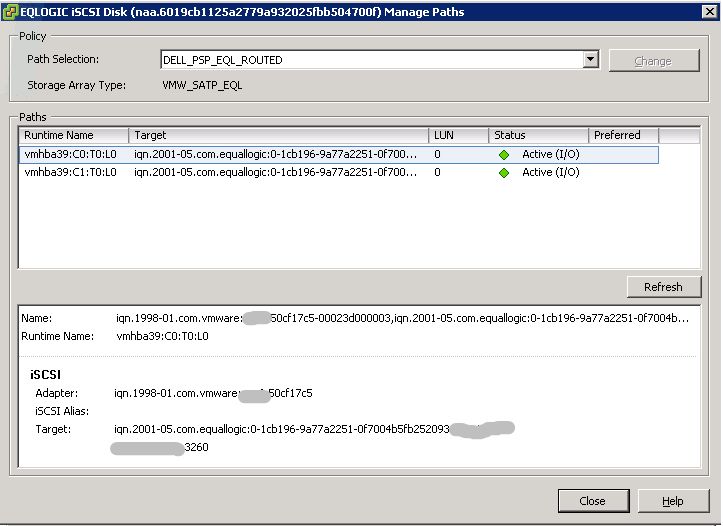
after-paths

This is what it looked like before the install:
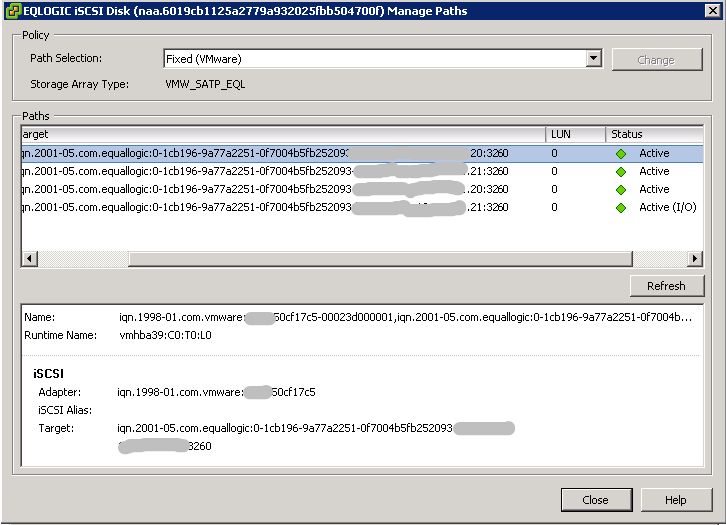
before-paths

Here you can see that there were 2 active connections to each controller, however, only 1 was being used for I/O. Once MEM is installed, there are redundant active connections to each controller and the load is more evenly balanced.

As I mentioned before, the MEM is totally functioning, however, in order to use the new esxcli commands that are available to manage and report on, you’ll have to restart the hostd agent on the esxi host.

Enable SSH on your host and log into it.

Restart the hostd service:

# /etc/init.d/hostd restart

restart-hostd

The new commands are now available. To list them:
# esxcli equallogic

eql-cmds

Log out of the host and disable SSH.

Done!
For more information on Dell’s MEM, read this great blog post from Cormac Hogan of vMWare.
ESXi 4.1 to 5.1 Upgrades with VUM

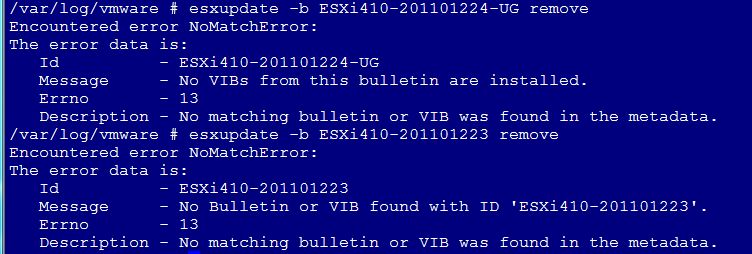
This is a really good post about how to remove software modules that are no longer needed. I came upon this issue when upgrading from ESXi4.1 to ESXi 5.1. One of my hosts wouldn’t remove the drivers.

esxupdate encountered error

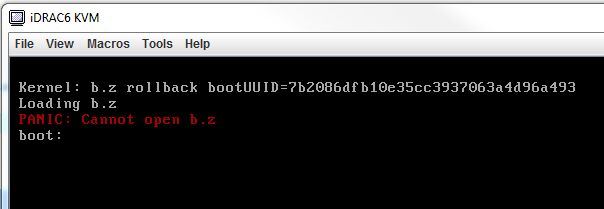
I uploaded the offline bundle zip to VUM and created a host extension baseline and ran it against the host. The host had a kernel panic and didn’t boot up.

kernel panic

I had to upgrade that particular host from the ISO and forgo update manager so all is well.

I was even given this post from VMware technical support when I called. I’d already happened upon it, but it was impressive that his blog post was on the tech’s radar.

Having VT enabled on your CPU isn’t all you need to run a nested ESXi enviroment in VMware workstation 9

I built an ESXi 4.1 test environment in workstation 9 to test and document an upgrade from vSphere 4.1U2 to 5.1U1a

Overview of ESXi enviroment

My test box is:

  • Dell PowerEdge 2900 with (2) dual core Intel Xeon 5160’s
  • 24GB RAM
  • iSCSI Lun attached to hold my VMDKs
  • 2008 R2 Enterprise SP1 with VMware workstation 9.0.2 (upgraded from 8.0.2)

I wanted to install some 64-bit VMs inside of my ESX servers and after some cursory reading and searching, I was under the impression that I could. The first thing was to make sure that CPU could handle a 64-bit OS (Intel® 64) VT (Intel® Virtualization Technology (VT-x) and XD (Execute Disable Bit). I went to the Intel site and looked up my processor. Looks like I was ready to go. (I missed the part about EPT=No at the bottom  as Mike would say, “RTFM”)

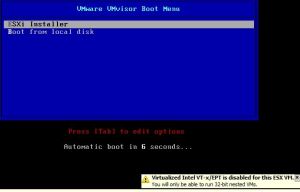
After installing the DC,SQL, vCenter server and making sure communication between the 3 was working, I created my 1 ESXi VM and when I powered it on I got this warning:

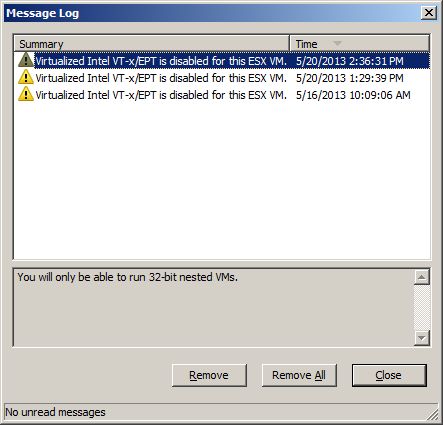
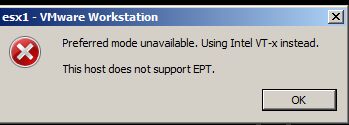
Intel VT-X/EPT is disabled for this ESX VM

vt-xept_disabled

There is a setting on the VM under processors that should be enabled. I checked the box, proceeded with my installation.

esxinstall-eror-fixed
Edit the settings on the ESXi VM and enable VT

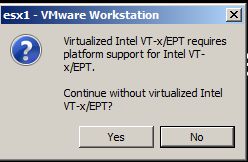
I configured the host, added it to the cluster. So I thought I was in the clear. Somewhere along the line, before I tried to install a guest, I saw this message.

Virtualized Intel VT-x/EPT alert
I clicked yes to continue. Clicking no wouldn’t let me proceed.

I searched this message and the previous one and found several posts that suggested  confirming the bios settings on the machine that’s running workstation, enabling VT in the settings (we did that) vmx or /etc/vmware/config hacks to fix it and nothing worked. I went so far as to update the bios on the server just in case there were some features that were not exposed on the version I was currently running.

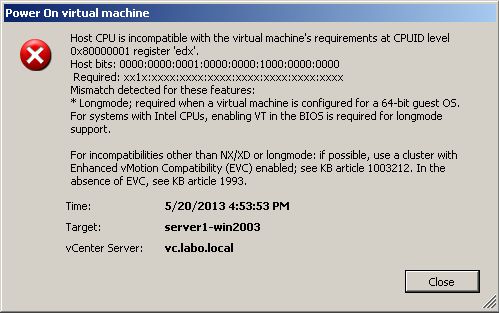
Here are several errors I got when I tried to install 2003 R2 64bit on the ESXi host:

buildingcluster-01

buildingcluster-error01
buildingcluster-error02

I posted on a vmware community for workstation and got a response that I really didn’t anticipate:

The implication of the message, “Virtualized Intel VT-x/EPT is not supported on this platform,” is that your host does not support EPT.

OK, so there is one more technology that is required to run a nested  64-bit environment. But what is EPT and when did it become so important?

The ability to run a nested environment is fairly new. The newer processors (AMD and Intel both) have begun to include Extended Page Tables (EPT) in to their procs (Nested page tables in AMD). EPT allows each guest VM to have it’s own page table to keep track of virtual & physical memory.

I have my nested environment running fine, there just aren’t any 64-bit VMs running on any of the ESXi 4.1 hosts.

For more info on EPT and Memory Management read here and here.
Social media & sharing icons powered by UltimatelySocial