Category: Windows

Installer must be run as administrator

I just got a call from the helpdesk that a tech wasn’t able to install from an MSI on the apps share from a file server. I checked his share & security permissions (OK) he could install other MSIs(OK)

I copied the file to the workstation he was working on and still the same error. Whelp, it’s not the share. Checked that he was in the local admins group on that Windows 10 workstation (OK) had him reboot and still no go. He was not able to run the MSI on this system. I had him launch an command prompt as administrator, browse to where I put the MSI and had him install using msiexec.

msiexec /a "NameOfInstaller.msi"

The /a option means to install it as administrator. It worked for him.

How to SSH into your Lightsail Server from Windows

Lightsail is an Amazon Web Services (AWS) offering that allows you to quickly spin up a preconfigured virtual private server (VPC). It’s a wizard-driven server deployment that has everything you need to get a server up and running quickly and for a low and predictable price of $5 month. It a great way to get your app, blog or website off of shared hosting and onto it’s own server where you don’t have to jockeying for resources and you can scale up, if needed (not a hot add, but there are ways to increase your bundle)

When you deploy your server, you’ll be asked to download your key pair.

If you didn’t do it then, you can always go back to your instance and download them now.

I’m working on a Windows 10 workstation, so I’ll be using Windows tools to do this:

  • PuTTY Key Generator
  • PuTTY

Both can be downloaded here.

These tasks can be done on Linux and MacOS using the native SSH commands from the terminal and the .pem.

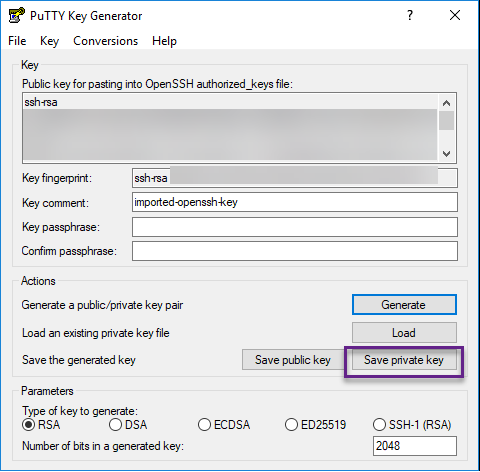
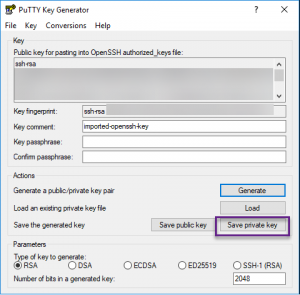
Open PuTTY Key Generator. Go to Conversions > Import Key

Generate a private key with PuTTY Key Generator

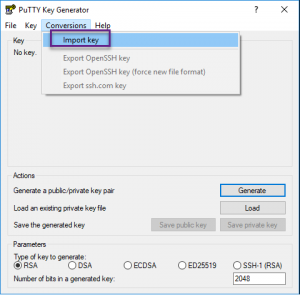
Browse to the .pem you download from Lightsail. Click Save Private Key. Give the private key a name and click save.

Save the generated private key with Key Gen

enter hostname

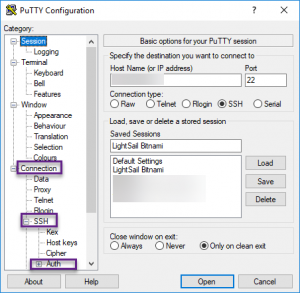
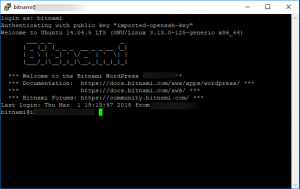
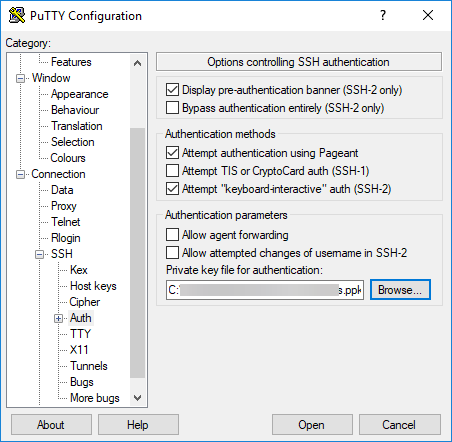
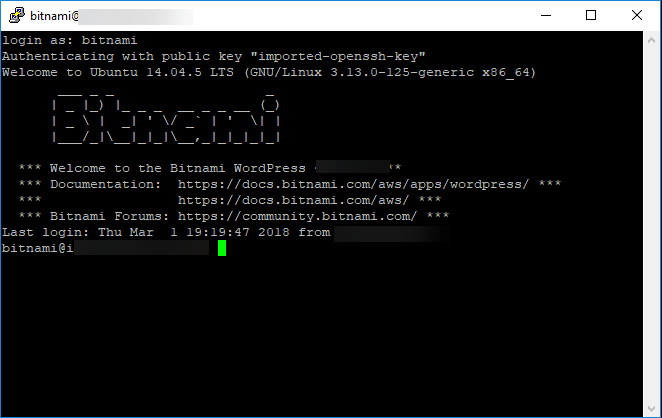
Close key gen and launch PuTTY. Enter the server IP, under Saved Sessions, give it a name then click on Connection > SSH > Auth. Browse to the private key you just created. Scroll back up to the Session category and click Save. Click open to launch your SSH session. Log into the server with the username.

Browse to the private key

log into your server

Edit files from Windows Command Line

I was adding entries to my hosts file on Windows 10 and I got an Access is Denied message when I saved the file in Notepad. Here are 2 quick ways to edit system files.

1) Right+Click Command Prompt or Notepad and Run as Administrator (old faithful)
2) From the Command Line, as Administrator,  start notepad.exe “hosts” (from the etc folder of course) or for more bang for your buck, open notepad++ with start notepad++.exe “hosts” if you have it installed.

Command to edit files from the command line

Adding space to a vDisk on a PERC 5/i Controller Part 1 of 3

We’ve all been there, running a server that’s way past it’s prime on 6 year old hardware. The application grows, the size on the partitions shrink. Then one day, you get the call and things aren’t working ‘right’ because there is no space. You suggest P2V or reinstalling the application on a VM. You’re met with stares, grumbles of “I’m too busy” and looks of utter discontent.

The only thing to do is add more disks and grow the drives in question.

How to add drives to a vDisk on a PERC 5/i integrated controller

(disclaimer! These are the steps I took, they may not work for you in your environment)

  • Before performing any hard disk reconfigurations, please make sure you have a good (tested) backup of your server. As with all HD reconfigurations, there is a risk of data loss.
  • Confirm the Dell Open Manage Server Administrator is installed. If not, download and install it.
  • Add the hard drives to the server and reboot. They should be the same size or larger.
  • Boot to the PERC (raid controller) in the bios. On the Dell PowerEdge it’s CTRL+R
  •  There is an additional menu  that now appears up top called Foreign View. CTRL+N  over to the Foreign View menu and view the additional disk group. You’ll see it’s marked as foreign.

PERC 5/i Integrated Bios Configuration

  • Highlight the Controller where the foreign configuration exists, press F2 . Use the arrow keys expand the menu with the arrow keys and select clear. Clear will delete the foreign configuration (example, if you’re using disks from another server). Press Enter.

Clear foreign configuration

  • Press OK if you’re sure you want to clear the configuration.

Confirm Clear

  • Press OK. You’ll see that the foreign view menu has disappeared.

noforeignview

  • Exit the BIOS utility by pressing ESC. Reboot the server.
  • Log into the server and launch Server Administrator. Expand the Connector and the physical disks. The state of the disks should read “Ready” and the used RAID disk space as 0GB.

disk ready

  • From the left pane, click on the virtual disk and click the down arrow next to Available Tasks. Select Reconfigure and click execute.

osma-reconfig

  • Click the connector to view the physical disks. Select the disks that you just installed by clicking the check box.

Select Physical Disks to add to the vDisk

  • The new disks are now listed under selected physical disks. Click continue.

osma-reconfigvdisk-1of3b

  • Select the current raid level of the current disks. If your virtual disk is currently RAID-5, make sure you select RAID-5. Click continue.

Select Disk Attributes

  • Review the new virtual disk configuration. Click finish.

osma-reconfigvdisk-3of3

  • The disk reconstruction will begin and the progress will be displayed.

omsa-reconstruct

  • This will take several hours to complete.  Once finished, view disk management. There you can see the new unallocated space at the end of the disk.

diskmgmt-unallocated

  • To grow C:\ the free space must be immediately following that partition.  Use disk part to move the partitions around (steps to follow). First, you can grow D:\ by using diskpart.

Continue on to Step 2

Adding space to a vDisk on a PERC 5/i Controller Part 2 of 3

To Grow the D:\ Drive

This is part 2 of the “Adding space to a vDisk on a PERC 5/i Controller” post.

Back to Part 1

  • Launch diskpart from the command prompt.  #diskpart (enter)
  • It opens in another window.  Enter  #LIST DISK (enter) and review the disks of the server.
  • Enter #LIST VOLUME   (enter) to view the volumes. Note the volume numbers next to the drive letter.  You will select the volume that you would like to grow.

diskpart-listvolume

  • #LIST PARTITION (to view the partitions)

diskpart-listpartition

  • Enter #SELECT DISK # (the number of the volume you’re growing). This is to bring focus on the disk that you’re working with. OR
  • Enter #SELECT VOLUME 2 (the D:\  is what we’re growing so we will have enough space to ‘give’ to C:\)
  • Decide on the size that you’d like to grow the disk by (in MB). In this example, we grew the disk by 100GB. Enter #EXTEND SIZE=100000 (100GB~)
  • You’ll see the success message immediately  following.
  • Enter #LIST VOLUME (to review the size of the new volume.  It will have an asterisk beside it)

diskpart-extend

  • Enter #LIST DISK to view the available space on the vDisk.

diskpart-listdisk-done

  • Enter #EXIT to close diskpart.
  • Go back to disk management and view the size change of D:\ and the unallocated space.

diskmgmt-unallocated2

Next Step: Growing the C:\ Drive

Adding AD Users and Computers to Windows 2008R2

I’m human. Someone asked me how to get to Active Directory Users and Computers (ADUC) on a 2008 R2 and my first response was, look under Administrative Tools.  Well, as luck would have it, it’s not there. Where is it, MMC? admintools? adminpak?  I wasn’t sure. This is a new server and not under my purview so I just assumed it was there.   Sometimes I think I’ve forgotten more that I remember, but then, It dawned on me, this is 2008R2 and EVERYTHING is either a role or a feature.

Problem

How to add Active Directory Users and Computers to a Windows 2008 R2 Server

Solution

  • Launch Server Manager
  • Click on/Expand Features
  • Click Add Features
  • Scroll down and expand Remote Server Administration Tools
    • Expand Role Administration Tools + AD DS and AD LDS Tools
    • Select AD DS Snap-Ins and Command-line Tools

    Add Remote Server Administration Tools

  • Click Next. Confirm installation selections and Click install.
  • Click Close when the installation succeeds.

aduc-installed


Social media & sharing icons powered by UltimatelySocial