User Powershell to see which AD groups a users belongs to

For the past upteen years, to get a list of the groups a user belongs to, I’ve used:

> net user /domain userID

Today, I just stumbled upon a powershell cmdlet that does just that.
Get-ADPrincipalGroupMembership

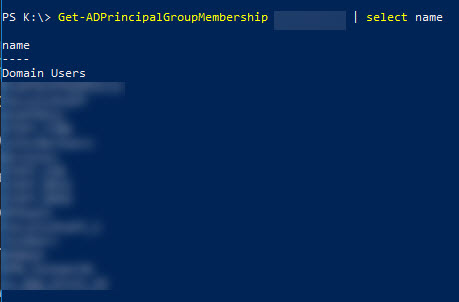
To get a list of groups a users belongs to run the following at a powershell prompt.

PS c:\ >Get-ADPrincipalGroupMembership userID | select name


Screenprint of Powershell window

Note: You will need the Active Directory Powershell module and that comes from installing RSAT.

Configure logrotate on a specific log file

There is a log file that I only want to keep 4 days worth of logs for.  Here is how you configure logrotate to rotate logs to your specific needs.

Logrotate is a system utility that rotates, compresses and mails system logs as needed on your Linux system.  Located in /etc on RHEL based systems, it has default parameters set for certain files, but also allows for you to chose your own files to be rotated, as needed. To configure /var/log/slapd to rotate logs daily and only keep them for 4 days, here are my steps.

Switch to root and vi /etc/logrotate.conf

~ ] # vi /etc/logrotate.conf

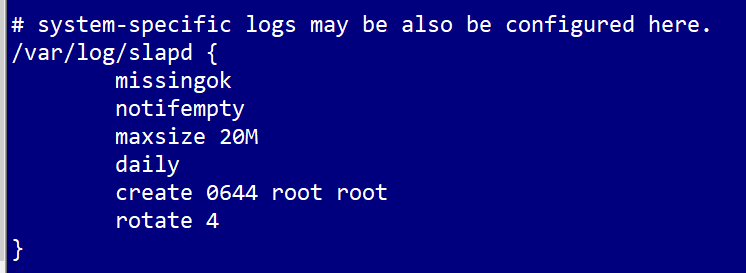
At the bottom of the file, there is a section where system-specific logs can be configured for rotation. G$ to get to the end of the file and i for insert. Make a new line and enter the path to the file with opening and closing bracket to  place your rotation parameters.

Screenhost of logrotate.conf

  • missingok means that if the file is missing, go to the next one and don’t throw an error.
  • notifempty means that the file shouldn’t be rotated if it’s empty.
  • maxsize is the max size the file can get before it’s rotated. 20M is the size of the file in megabytes.
  • daily means the log file will be rotated every day.
  • create  0644 root root means that log file that is rotated, a file will be created with 0644 mode set on the file. The owner and group on the rotated file will be root.
  • rotate 4 means that the log will be rotated 4 times before it’s removed from the system.

Close the file, :wq! and run logrotate to see if it’s working.

~ ] # logrotate -v /etc/logrotate.conf

I used the -v switch to see the verbose output of the command.

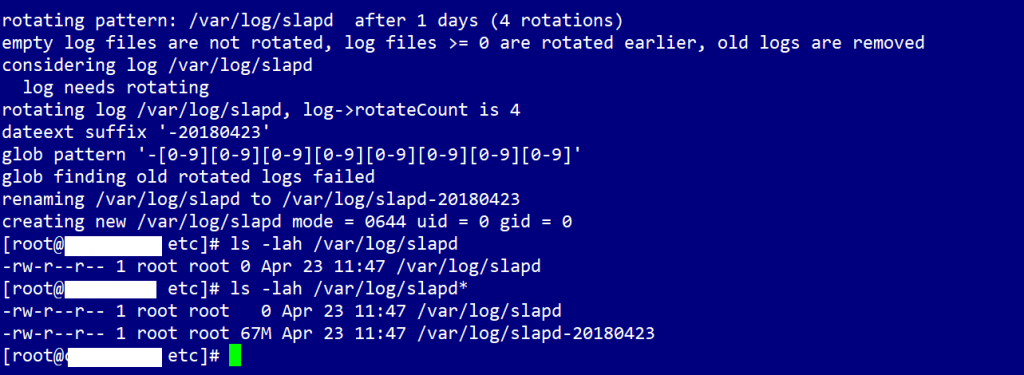
Output of running logrotate

The output tells you what is happening during the running of the command. It runs against the slapd file and lists the rotation schedule, then says it won’t run against empty files and that old log files will be removed. The file is rotated and a suffix is appended to the old log file. It lists the glob pattern (it resembles regular expressions, but much simpler ) and looks for old files to delete. As you can see, there were none.The file is renamed and a new file is created with the mode you stated. I list the files and as you can see, the file has been rotated and a new, blank is ready for the days logs.

The man pages for logrotate and logrotate.conf are very helpful in this case. Be sure to read them to see how many options you can use to configure your logs to rotate.


Assigning Registered Domain Name to Lightsail Server

There are a few prerequisites to assigning a domain name to a Lightsail instance.

  1. You must have a domain name registered with a provider of your choice.
  2. A running Lightsail server
  3. Static IP assigned to your server.

Assign Static IP to Lighsail server

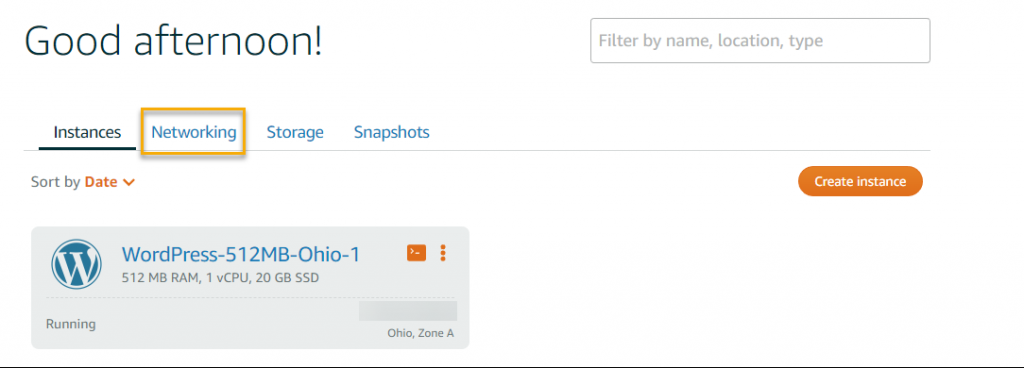
Log into the Lightsail Console and click on the Networking Tab

Lightsail Console- Instance Tab

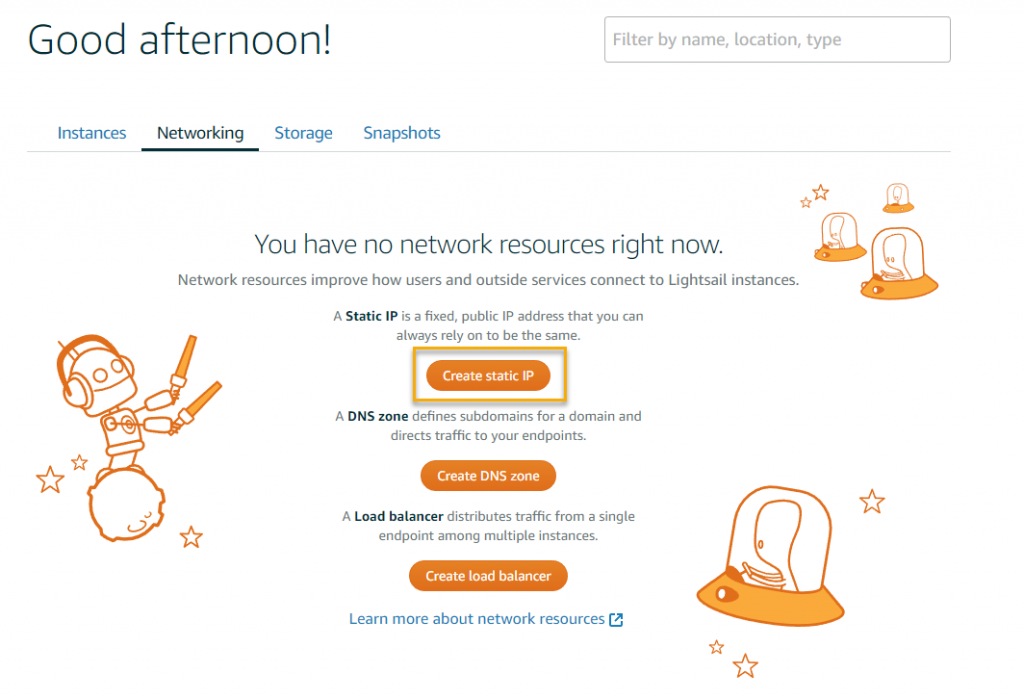
Click Create static IP

Lightsail Console-Create Static IP

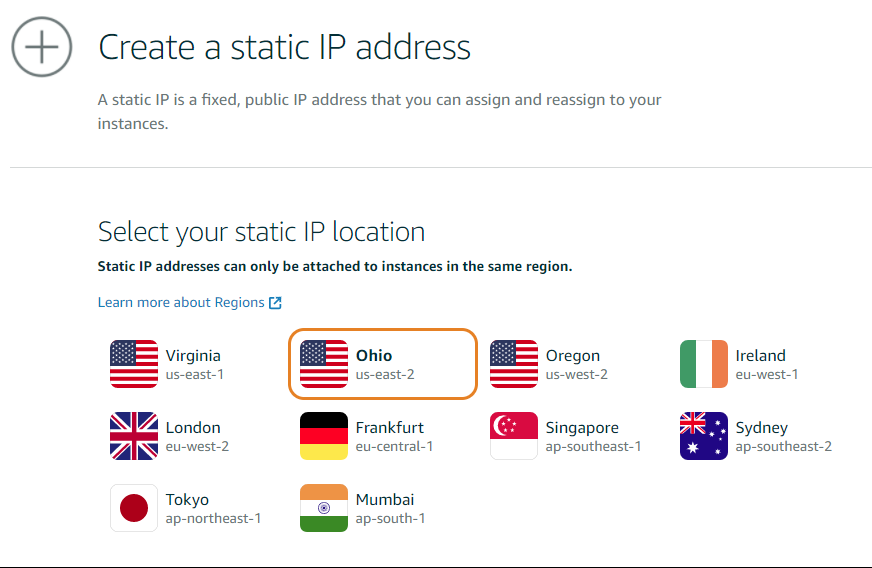
Select your static IP location. Note, you must already have an instance running in that region in order to attach a static IP to it.

Lightsail Console-Select IP Region

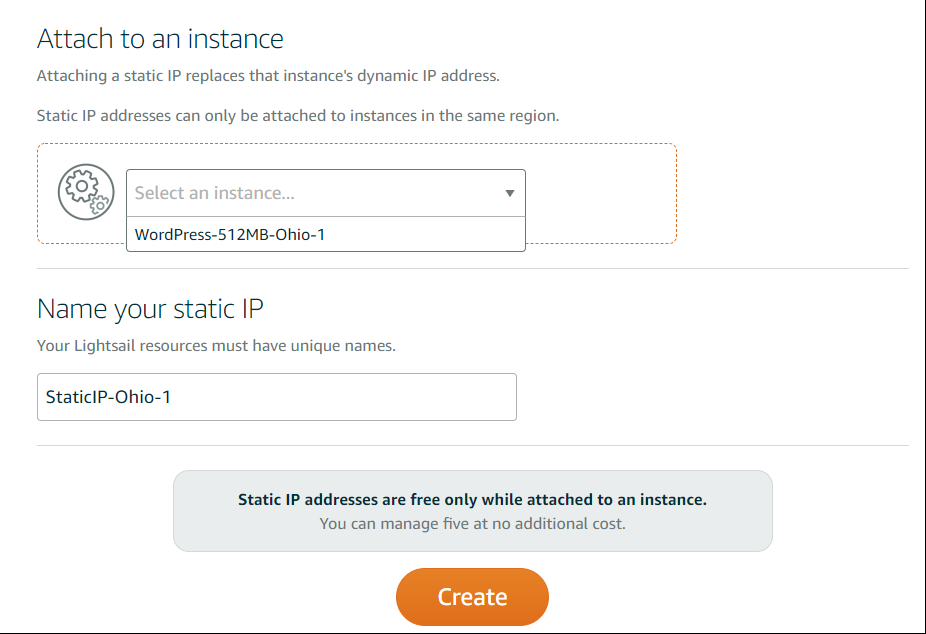
Select the instance that you’re assigning the static IP to from the drop down box. Give your static IP an unique, recognizable name. Click create.

Lightsail Console-Attach to an instance

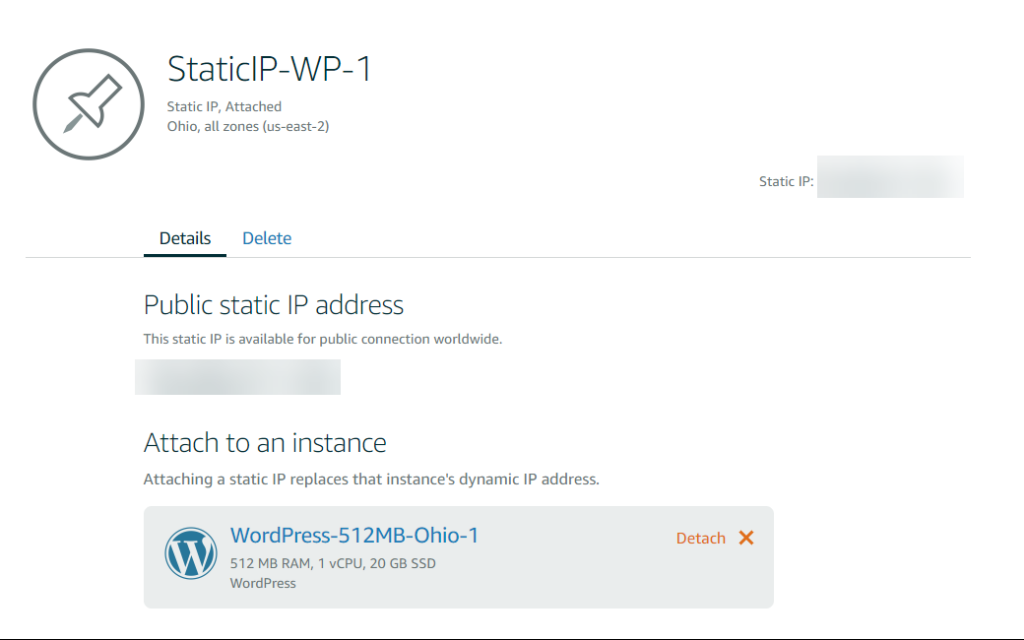
Once you’ve clicked create, your IP will have a pin next to it, noting that is it attached to the instance.

Lightsail Console- Pinned Static IP

Assign DNS Zone to Lightsail server

Click on the HOME menu at the top of the page. Click on Networking > Create DNS zone

Lightsail Console-Home button

Lightsail Console-Create DNS Zone

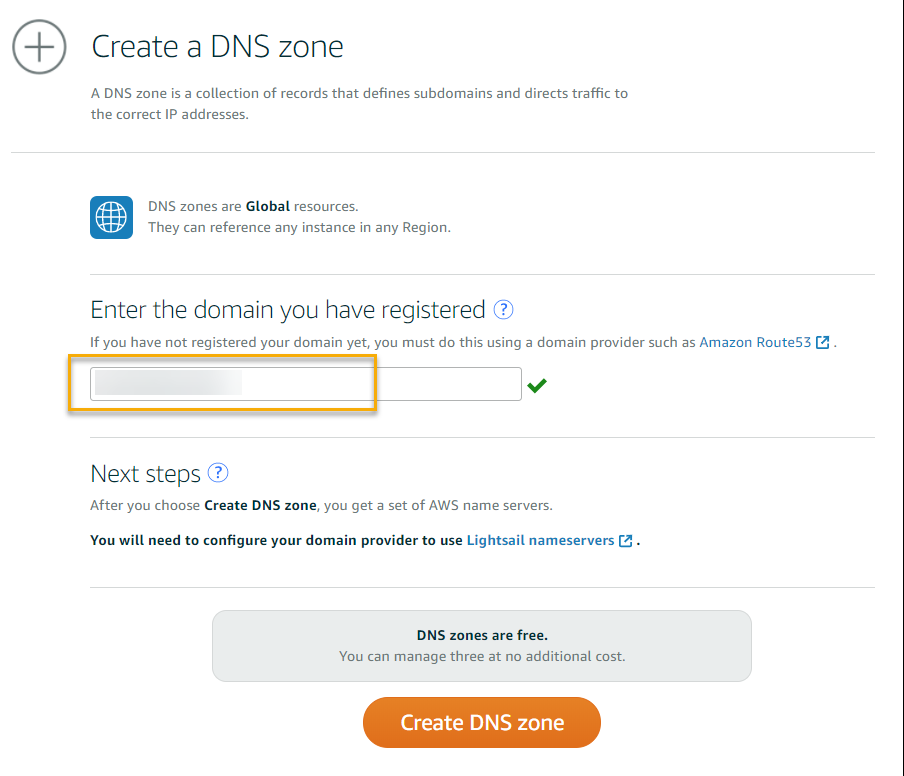
Enter your domain name and click Create DNS Zone.

Lightsail Console-Enter Domain Name into DNS Zone

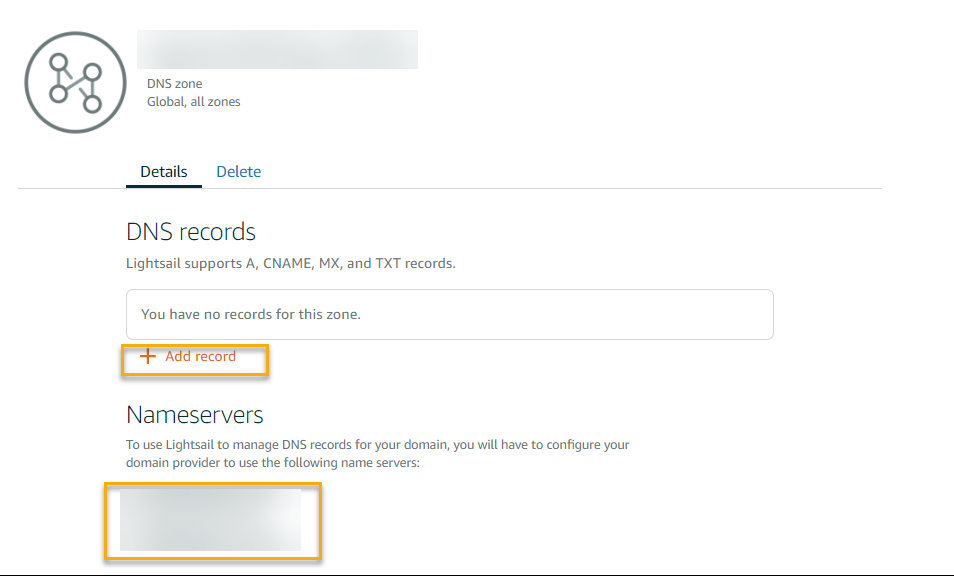
Click Add Record:

Lightsail Console- Add A Record

Lightsail Console- Add A Record and Domain Name


Add an A record:

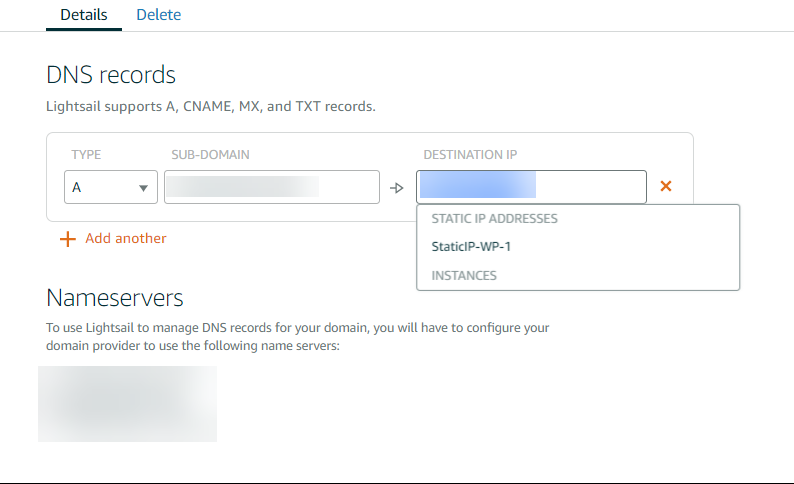
Make sure the Type is A. Click in the subdomain box and enter www.yourdomain.com .

In the destination IP box, select your Static IP name and click save.

Nameservers:

You will be given a list of name servers to point your domain to.  I’m using Hover and here is how I point my domain to my Lightsail server.

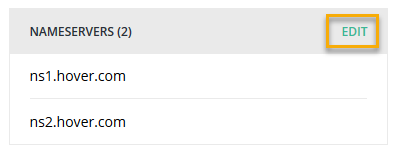
Log into your  Hover account and on the overview tab, scroll down to nameservers and click edit.

Hover Console- Tabs

Hover Nameservers

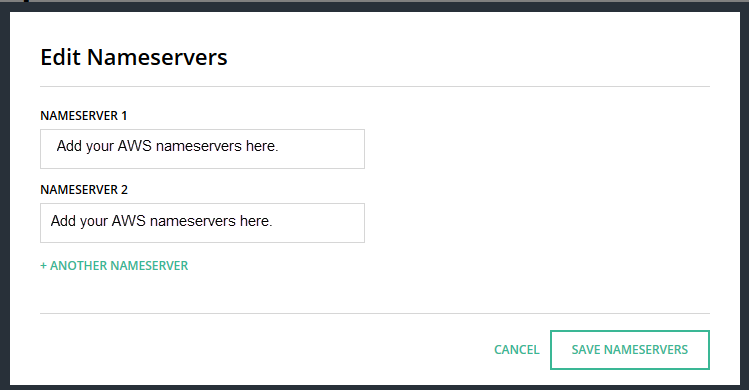
Enter the name servers give to you in the DNS records tab in your Lightsail console. You must add at least two. Add additional nameservers by clicking the plus sign. When you’re done. Click Save Nameservers.

Hover- Edit Nameservers

Edit DNS Records:

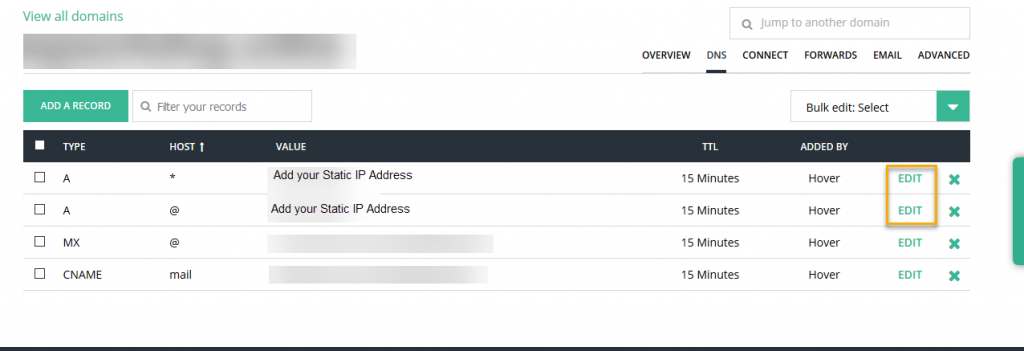
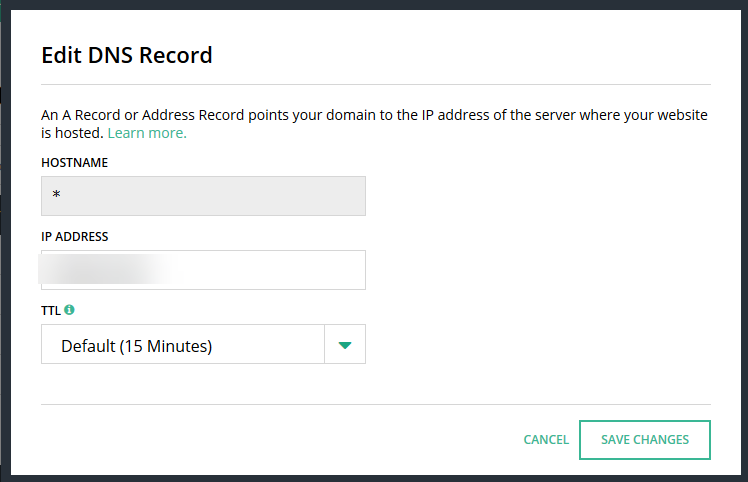
Click on the DNS tab and review your current DNS settings. Click edit next to the A (*) record and enter the static IP or your Lightsail server.

Hover Console - DNS Records

Hover- Edit DNS Records

Click Save Changes and repeat for the A(@) record.

Test your changes by entering your domain name into a browser to see if your website loads.

If it doesn’t load immediately, be patient. It can take anywhere from 24-48 hours for DNS to propagate.


WordPress on AWS

I was invited to Philly ‘burbs WordPress meetup to give a talk about how to install WP on AWS. I’d given this talk before in an impromptu setting, my dining room table, to my monthly coding group. It was more of a workshop, really hands on and at the end, everyone was a command-line hero in my book. Most, never having logged into a Linux server before, let alone deploying a server in the cloud.

Woman gesturing at Screen
Photo Cred: @accessamy

Liam, the group leader, saw a tweet about it and invited me to present it to his group. Here are the videos and the slide deck from the MeetUp.

WordPress on AWS Part 1:
https://youtu.be/e3GaqR0r7Os
WordPress on AWS Part 2
https://youtu.be/CCZPKvHvYlU
WordPress on AWS Part 3
https://youtu.be/ksVu2YbMLeg
Slides:
https://bit.ly/2qkuvEN


How to SSH into your Lightsail Server from Windows

Lightsail is an Amazon Web Services (AWS) offering that allows you to quickly spin up a preconfigured virtual private server (VPC). It’s a wizard-driven server deployment that has everything you need to get a server up and running quickly and for a low and predictable price of $5 month. It a great way to get your app, blog or website off of shared hosting and onto it’s own server where you don’t have to jockeying for resources and you can scale up, if needed (not a hot add, but there are ways to increase your bundle)

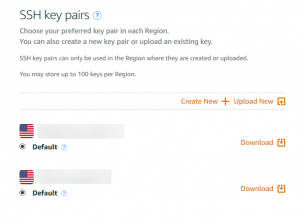
When you deploy your server, you’ll be asked to download your key pair.

If you didn’t do it then, you can always go back to your instance and download them now.

I’m working on a Windows 10 workstation, so I’ll be using Windows tools to do this:

  • PuTTY Key Generator
  • PuTTY

Both can be downloaded here.

These tasks can be done on Linux and MacOS using the native SSH commands from the terminal and the .pem.

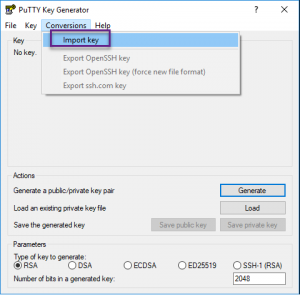
Open PuTTY Key Generator. Go to Conversions > Import Key

Generate a private key with PuTTY Key Generator

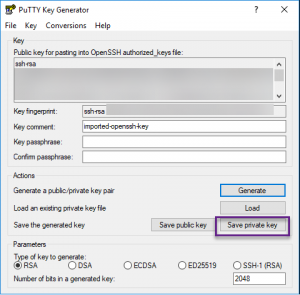
Browse to the .pem you download from Lightsail. Click Save Private Key. Give the private key a name and click save.

Save the generated private key with Key Gen

enter hostname

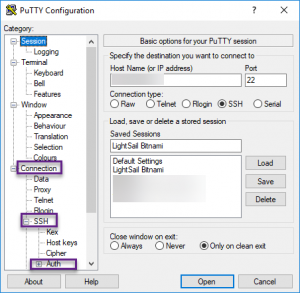
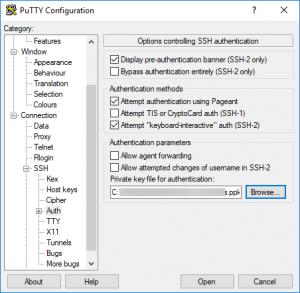
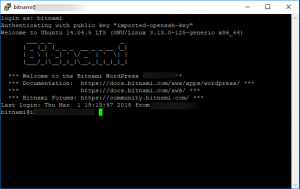
Close key gen and launch PuTTY. Enter the server IP, under Saved Sessions, give it a name then click on Connection > SSH > Auth. Browse to the private key you just created. Scroll back up to the Session category and click Save. Click open to launch your SSH session. Log into the server with the username.

Browse to the private key

log into your server

Compare 2 files with PowerShell

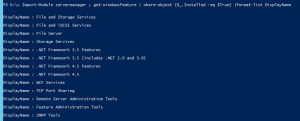
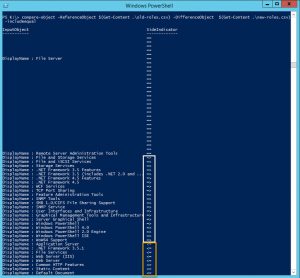
I’m building a new 2012R2 server that will replace an existing 2008R2 application server. I want to see what roles I need to install on the new server, so I run the Get-WindowsFeature cmdlet in PowerShell to give me what I need.

PowerShell Get-WindowsFeature Output

I have saved the output of Get-WindowsFeature to .csv on 2 servers, a new server and the old, production server.

PS> Import-Module servermanager ; get-windowsfeature | where-object {$_.Installed -eq $True} | format-list DisplayName > old-roles.csv

PS> Import-Module servermanager ; get-windowsfeature | where-object {$_.Installed -eq $True} | format-list DisplayName > new-roles.csv

To compare the files, use the compare-object cmdlet.

From Microsoft:

The Compare-Object cmdlet compares two sets of objects. One set of objects is the “reference set,” and the other set is the “difference set.”

PS> compare-object $(Get-Content K:\old-roles.csv) $(Get-content K:\new-roles.csv) -includeequal


Side Indicator Meaning
== Item appears in both files
=> Item only appears in the difference set
<= Item only appears in the reference set

PowerShell compare-object output

The -ReferenceObject and -DifferenceObject options weren’t needed in this example. I got the same output with and without it.

So, on both new and old server, File Server, Remote Server Administration tools, are installed.
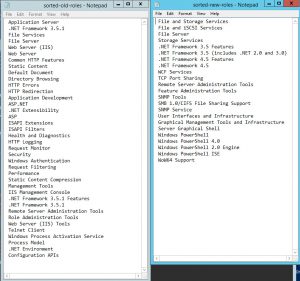
The new server has its own default roles and features installed and the old server has the list of roles that must be installed onto the new server, if applicable. The old server is 2008 and the new server is 2012 R2. Many features are now either default (PowerShell) or updated (.NET Framework 4.5). This list isn’t one to one, but it gives me an idea what needs to be installed in order to migrate a service from one OS to another. T

There are many useful applications for diff’ing files. What are some of your most common uses?

In addition:

You can assign the files to variables and use the split() function to get rid everything up to a delimiter and output the ‘newly cleaned’ file to a new file.

$old = Get-Content .\old-roles.csv
$new = Get-Content .\new-roles.csv

Get-Content $old | ForEach-Object {$_.split(":")[1] } > sorted-old-roles.txt
Get-Content $new | ForEach-Object {$_.split(":")[1] } > sorted-new-roles.txt

$newsort = ".\sorted-new-roles.txt"
$oldsort = ".\sorted-old-roles.txt"
Compare-Object $(Get-content $oldsort) $(Get-Content $newsort) -includeequal

Split Fucnction results

Of course, just using the diff command on both files in Linux would have given me what I needed in 5 seconds, but as we know, it’s all about learning the process.

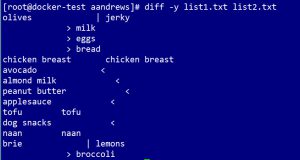
Linux diff output
Linux would have made comparing the files a little bit easier
Gutter Markings Meaning
White space These lines are common in both files. In both files, you have chicken breast, tofu and naan.
> The files differ here. the second file listed in the command has this entry. The first file doesn’t, like milk, eggs, bread and broccoli.
< The files differ. The first file only has this entry. The second file doesn’t, like avocado, almond mil and peanut butter.
| These lines differ, meaning if we were to merge the two files, we’d have to resolve if we want to keep one or both entries.

Changing Runlevels in RHEL 6.x and 7.x

Most of my servers are running RHEL 6.9, but some are running 7.4 and one has xwindows installed. Changing the runlevel is different now.

To check the current runlevel in RHEL 6.X:

# runlevel

To disable the GUI at boot-up in RHEL 6.x:

 # vi /etc/inittab

Edit /etc/inittab and change the line id:5:initdefault  to id:3:initdefault

Save the file and reboot to confirm.

To check the current runlevel in RHEL 7.X:

#  systemctl get-default

To disable the GUI at boot-up in RHEL 7.x:

 # systemctl set-default multi-user.target

Save the file and reboot to confirm.


Fab 5 Linux Tips: logins

This is the first Fab 5 Linux tips of the series. I’ll post 5 tools, commands, hacks, configs, etc that you can use for administering your Linux Systems.

Here are the Fab 5 quick tips on keeping up with users who log into your servers.

  1. lastlog
  2. w
  3. who
  4. lslogins
  5. last

lastlog – reports the most recent login of all users or of a given user

# lastlog

Lastlog alone prints out the last login of all the users on the system. Accounts that have never been used and service account that don’t log in, indicate that they’ve never logged in.

-u print out the last login of a particular user. It lists the pseudo terminal used, IP address the login came from, as well as the date and time.

# lastlog -u username


W shows who is logged on and what processes they’re running.

# w

W alone shows everyone who’s logged in right now.

# w username

displays a specific users login and what processes they’re currently running.

Who  show who is logged on. It’s slightly different than w, in that it just prints who’s logged in, what terminal and from what IP address. It doesn’t show what processes they’re running. Either one would work, if you’re just looking to see who’s logged in at the moment. Who as a few more options that give it a bit more functionality

# who -b

this give the last boot time of the server. Similar to #uptime, w tells you the time and date of the last boot, uptime gives you the current time and how long the server has been up and running.

#who -q

If you’re only looking to see just how many users are logged in at the moment, and not much else, this will do the trick

Lslogins display information about known users on the system.

#lslogins

Prints a list of logins (system and user)

#lslogins -fu

Prints out the failed logins of regular users

There is also a command called faillog that does the same thing, but it doesn’t appear to be installed on my RHEL 6.9 server and on Ubuntu 16.04, the information is pretty meaningless out of the box. YMMV.

Last and LastB show a listing of last logged in users.

#last -aF | head

Displays the last logins, with login and logout times.

lastb is the same as last, except that by default it shows a log of the /var/log/btmp file, which contains all the bad login attempts. Here you get a peek at all the attempts of people trying to log into your system.


Connect Drobo B800i to CentOS 7 via iSCSI

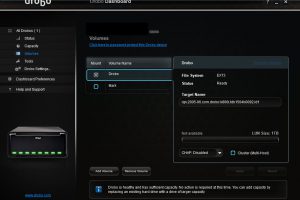
Drobo Dashboard
CentOS 7.4.1708 Kernel 3.10.0.-693.11.1.el7.x64_86
Drobo B800i Firmware 2.0.6

The Drobo and the host computer must be on the same subnet in order for this to work. (See Drobo Online User Guide)

Preparation

After configuring the device’s IP and other settings via USB from my Windows desktop using Drobo Dashboard, I created a 1TB, unformatted volume.
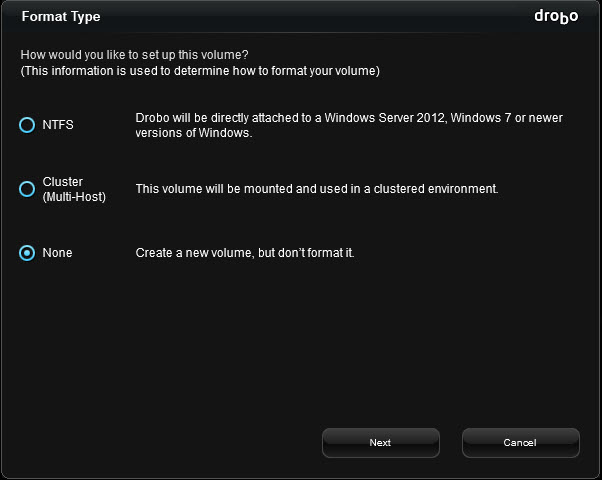
Format Dialog box

Information you’ll need to connect to machine:

  • Target Name
  • IP address of device

I did not enable CHAP, but it can be easily configured on the machine. I also disabled SELinux on this test box.

**note** your Drobo must be on the same subnet as your server.

I installed the iscsi initiator utilities.

$ sudo yum install -y scsi-target-utils

Configure the server

On the CentOS server, install the iscsi package

# yum -y install iscsi-initiator-utils

List out the /proc/partitions file to see the devices that you have currently. Once you login to the iSCSI volume, a new one will appear and that’s the one we’ll format.

# cat /proc/partitions

Add the target name to /etc/iscsi/initiatorname.iscsi file, save and exit.

#  vim  /etc/iscsi/initiatorname.iscsi
InitiatorName=iqn.2005-06.com.drobo:b800i.tdb1504b0092.id1

iscsiadm discovery command

Use the iscsiadm command to discover the target.

# iscsiadm -m discovery -t  sendtargets -p 10.253.53.25

Once your volumes are discovered, you can login to them

# iscsiadm -m node -T iqn.2005-06.com.drobo:b800i.tdb1504b0092.id1 -p 10.253.52.25 --login

List out the /proc/partitions file to see the new disk.

# cat /proc/partition
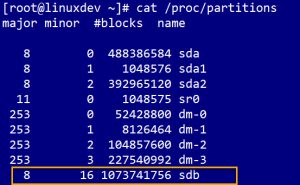
 

Command to display partitions

command to login the iscsi target

If the login is successful, run the dmesg | tail command to see if the kernel sees the logical blocks.

# dmesg | tail

Time to partition the device. 

Run the parted command against the device to create a new disk label. Run It again to create the primary partition

# parted --script  /dev/sdb mklabel msdos
# parted --script  /dev/sdb mklabel primary 0% 100%

If by chance you get an error that reads:

Warning: The resulting partition is not properly aligned for best performance

Read this blog post and make the adjustments. 2048s is a good choice for the starting sector.

Check the disk alignment

# parted /dev/sdb align-check optimal 1

If it returns 1 aligned, you’re good to go.

Format your disk

# mkfs.ext3 /dev/sdb1

*note* I’d read that this Drobo didn’t support ext4 and after formatting the volume, I found that to be false.

Mount your disk

# mount /dev/sdb1 /drobo

Confirm that you can write to it

# touch /drobo/testfile

Check the  file system disk space usage.

# df -hT

*Notes & Caveats*

  • All volumes on the Drobo were ‘visible’ in file manager. If you have multiple volumes on the target, you’ll see them all in GUI file manager.
  • They have a different name after each reboot /dev/sdb1 or /dev/sdc1,
  • Adding it to /fstab didn’t matter, since the name changed after every reboot.
  • They show as ‘on my computer’ and when I click on the drive, it mounts to /run/media/username/some-really-long-number-and-series-of-letters. The media directory isn’t even present  under the/ run director after a reboot. It only appears once I click on the disk in the file manager.
  • I’ve read a few blogs where it’s better to present the Drobo as 1 large volume to a Linux system.
  • I formatted it as ext3 just fine. I’d read in another blog that it doesn’t support ext4. I didn’t find a definitive answer in the online guide to confirm or deny it until I saw the above mentioned alert in the dashboard.

You can set the target to login and mount at boot by editing the /etc/fstab and by using the iscsiadm command to set it to automatic.
 

Leveling up skills with Linux Academy

My stand up desk with the Linux Academy Penguin

I haven’t been blogging much, I’ve been busy learning.

I got a subscription to Linux Academy and for the past month, I’ve been immersed in retooling for a skill switch into DevOps. I’ve been using Linux for years, but my goal is not to have a cursory understanding of the OS, but to be as comfortable in it as I am in Windows. I’ve gotten a few successful completions on a few courses on Linux Academy under my belt. I’m currently in the Linux, Cloud, and Ruby Coding learning path which consists of:

  • Linux Essentials Certification (done)
  • CompTIA Cloud Essentials Certification (in progress)
  • AWS Certified Solutions Architect – Associate
  • OpenStack Essentials
  • Nginx And The LEMP Stack
  • Introduction To Ruby Programming Language On Linux

Linux Academy Completion Certificate- Linux Essentials Linux Academy Completion Certificate- DevOps Essentials

I’ll sit for the LPI Linux Essentials exam this month and move on to the AWS Certified Solutions Architect-Associate exam after that.

In the meantime, I’m writing 2 blog series that will highlight some of the tools, commands, packages that I come across in my studies. Today’s 10 will highlight 10 commands, tips, tricks, etc. The other, Fab 5 will cover 5 quick hitters about Linux.

Stay tuned for more posts about my DevOps journey.


Social media & sharing icons powered by UltimatelySocial