Month: May 2013

Adding space to a vDisk on a PERC 5/i Controller Part 1 of 3

We’ve all been there, running a server that’s way past it’s prime on 6 year old hardware. The application grows, the size on the partitions shrink. Then one day, you get the call and things aren’t working ‘right’ because there is no space. You suggest P2V or reinstalling the application on a VM. You’re met with stares, grumbles of “I’m too busy” and looks of utter discontent.

The only thing to do is add more disks and grow the drives in question.

How to add drives to a vDisk on a PERC 5/i integrated controller

(disclaimer! These are the steps I took, they may not work for you in your environment)

  • Before performing any hard disk reconfigurations, please make sure you have a good (tested) backup of your server. As with all HD reconfigurations, there is a risk of data loss.
  • Confirm the Dell Open Manage Server Administrator is installed. If not, download and install it.
  • Add the hard drives to the server and reboot. They should be the same size or larger.
  • Boot to the PERC (raid controller) in the bios. On the Dell PowerEdge it’s CTRL+R
  •  There is an additional menu  that now appears up top called Foreign View. CTRL+N  over to the Foreign View menu and view the additional disk group. You’ll see it’s marked as foreign.

PERC 5/i Integrated Bios Configuration

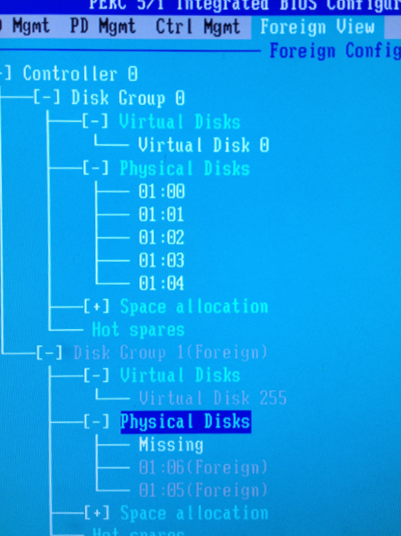
  • Highlight the Controller where the foreign configuration exists, press F2 . Use the arrow keys expand the menu with the arrow keys and select clear. Clear will delete the foreign configuration (example, if you’re using disks from another server). Press Enter.

Clear foreign configuration

  • Press OK if you’re sure you want to clear the configuration.

Confirm Clear

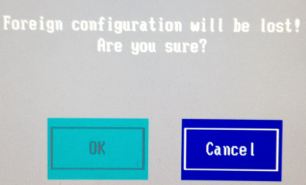
  • Press OK. You’ll see that the foreign view menu has disappeared.

noforeignview

  • Exit the BIOS utility by pressing ESC. Reboot the server.
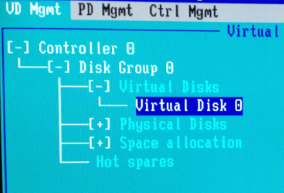
  • Log into the server and launch Server Administrator. Expand the Connector and the physical disks. The state of the disks should read “Ready” and the used RAID disk space as 0GB.

disk ready

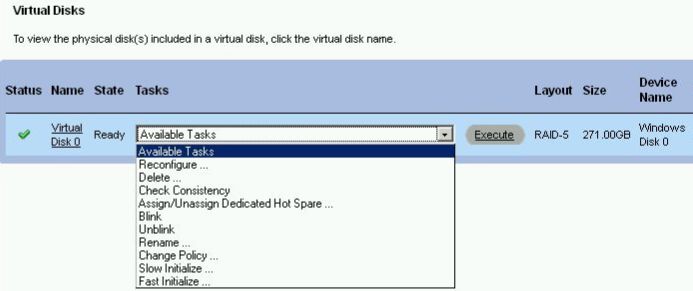
  • From the left pane, click on the virtual disk and click the down arrow next to Available Tasks. Select Reconfigure and click execute.

osma-reconfig

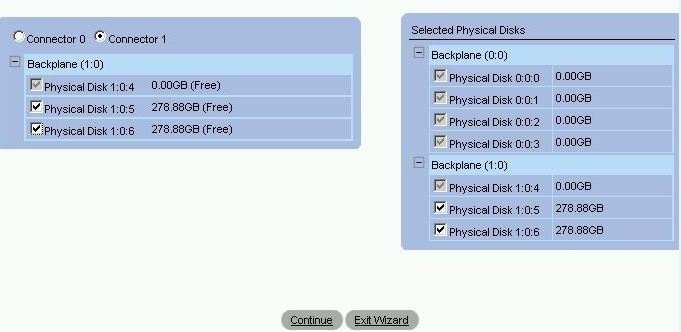
  • Click the connector to view the physical disks. Select the disks that you just installed by clicking the check box.

Select Physical Disks to add to the vDisk

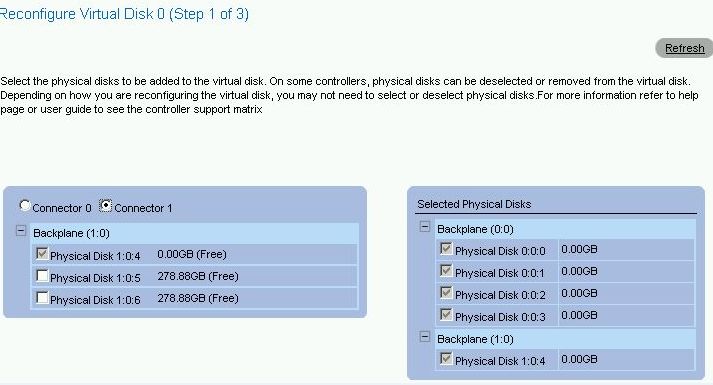
  • The new disks are now listed under selected physical disks. Click continue.

osma-reconfigvdisk-1of3b

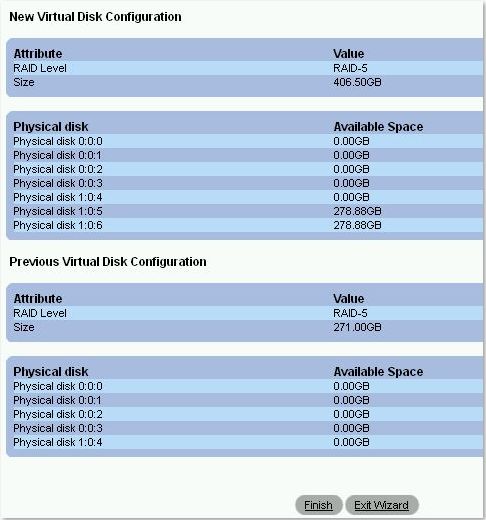
  • Select the current raid level of the current disks. If your virtual disk is currently RAID-5, make sure you select RAID-5. Click continue.

Select Disk Attributes

  • Review the new virtual disk configuration. Click finish.

osma-reconfigvdisk-3of3

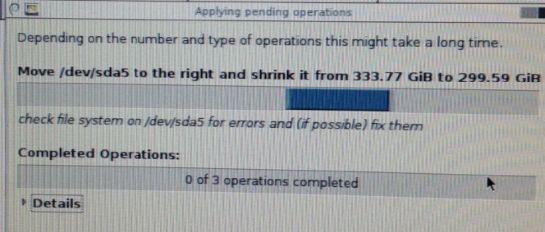
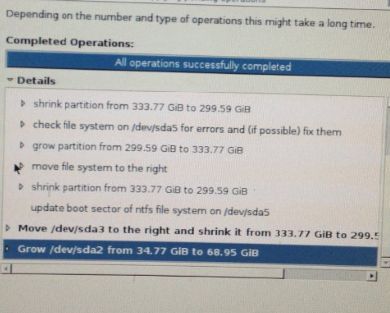
  • The disk reconstruction will begin and the progress will be displayed.

omsa-reconstruct

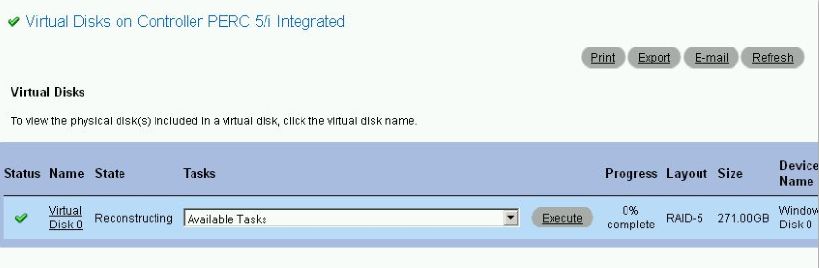
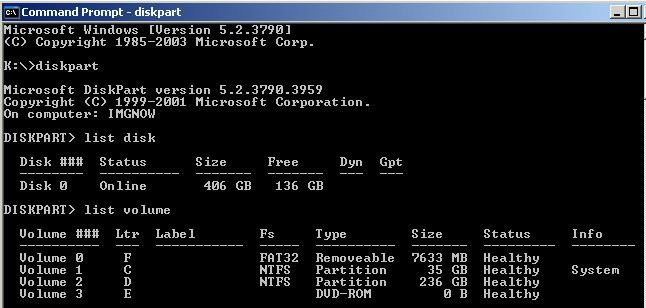
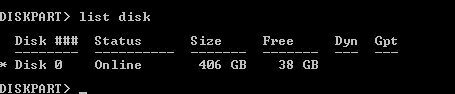
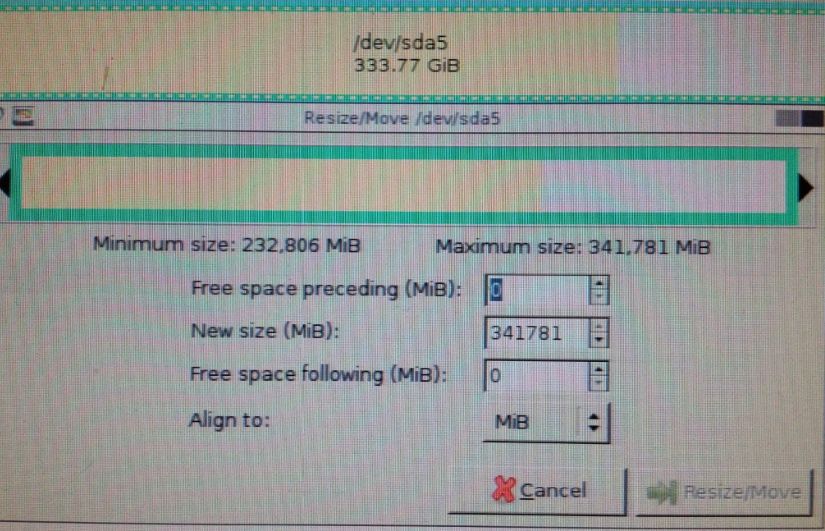
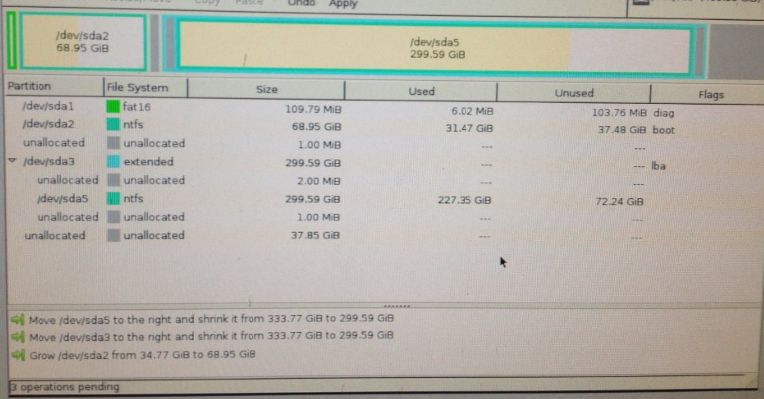
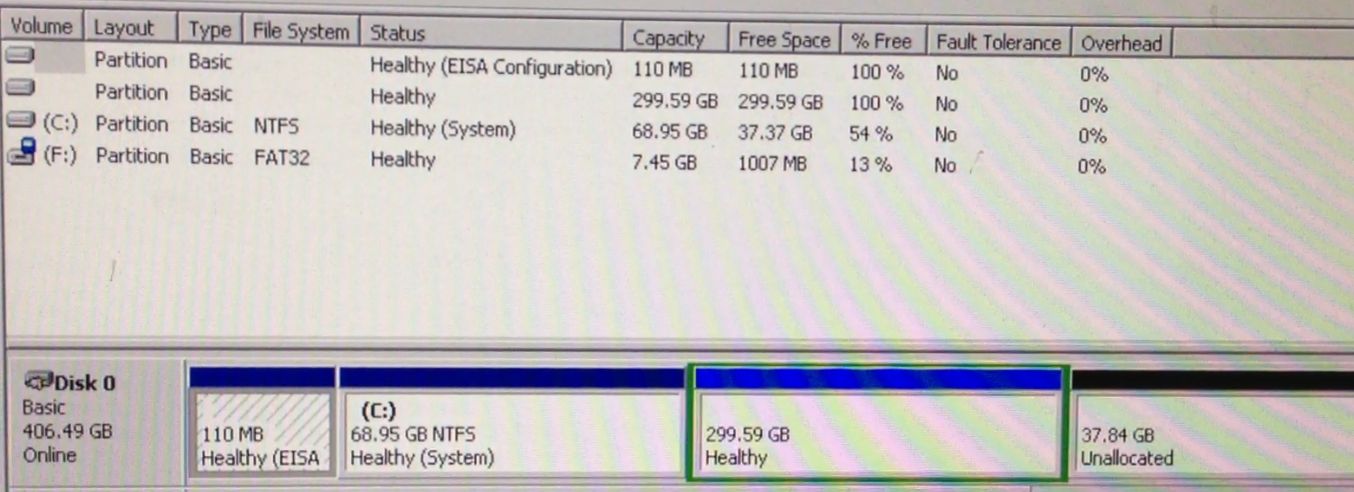
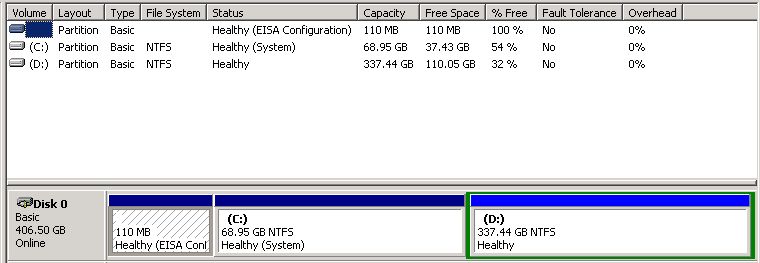
  • This will take several hours to complete.  Once finished, view disk management. There you can see the new unallocated space at the end of the disk.

diskmgmt-unallocated

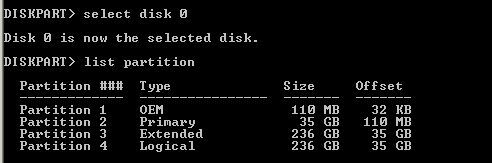
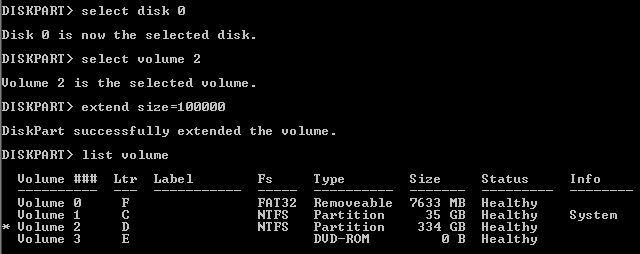
  • To grow C:\ the free space must be immediately following that partition.  Use disk part to move the partitions around (steps to follow). First, you can grow D:\ by using diskpart.

Continue on to Step 2

Adding space to a vDisk on a PERC 5/i Controller Part 2 of 3

To Grow the D:\ Drive

This is part 2 of the “Adding space to a vDisk on a PERC 5/i Controller” post.

Back to Part 1

  • Launch diskpart from the command prompt.  #diskpart (enter)
  • It opens in another window.  Enter  #LIST DISK (enter) and review the disks of the server.
  • Enter #LIST VOLUME   (enter) to view the volumes. Note the volume numbers next to the drive letter.  You will select the volume that you would like to grow.

diskpart-listvolume

  • #LIST PARTITION (to view the partitions)

diskpart-listpartition

  • Enter #SELECT DISK # (the number of the volume you’re growing). This is to bring focus on the disk that you’re working with. OR
  • Enter #SELECT VOLUME 2 (the D:\  is what we’re growing so we will have enough space to ‘give’ to C:\)
  • Decide on the size that you’d like to grow the disk by (in MB). In this example, we grew the disk by 100GB. Enter #EXTEND SIZE=100000 (100GB~)
  • You’ll see the success message immediately  following.
  • Enter #LIST VOLUME (to review the size of the new volume.  It will have an asterisk beside it)

diskpart-extend

  • Enter #LIST DISK to view the available space on the vDisk.

diskpart-listdisk-done

  • Enter #EXIT to close diskpart.
  • Go back to disk management and view the size change of D:\ and the unallocated space.

diskmgmt-unallocated2

Next Step: Growing the C:\ Drive

Adding space to a vDisk on a PERC 5/i Controller Part 3 of 3

To Grow the C:\ Drive

This is part 3 of the “Adding space to a vDisk on a PERC 5/i Controller” post.

Back to Part 1 or Part 2.

Growing the system partition is a much more elaborate task. Download gparted (do not use 0.15.0, it’s buggy) and burn the ISO to disk. Make sure you have a full system backup before performing any disk modifications. Yes, that means YOU if this a production system.

Reboot the system with the gparted ISO in the drive. Press the enter key when you get to the boot screen. Follow remaining prompts to get you to the GUI. When asked which mode do you prefer, press 0 then enter.

gparted-1

  • Review the partitions and the familiarize yourself with your disk layout. Note which partition is the boot partition. For Windows, that is your C:\ drive. In this example, C:\ is /dev/sda2 and D:\ is inside the extended partition, /dev/sda5
  • Now this is where it gets tricky. Here I shrunk the /dev/sda5 partition from the left to add space to the beginning of the partition. Then I shrunk /dev/sda3 (the extended partition). Lastly, I grew the C:\ drive partition, /dev/sda2.

gparted-resize

gparted-resize2

gparted-resize3

gparted-resize4

  • Notice the several unallocated slices between the partitions, these occur when you have cylinder aligned and MiB aligned partitions on the same disk. Also, notice the unallocated space at the end of the partition (like when we started) this will taken care of in Windows, however we could handle it hear, but it seems quicker to do from the OS.
  • Once your partitions appear as you like them to, click Apply. This will queue up all 3 disk operations to disk. Depending on the size of your disk, this may take some time.
  • Click Details for more information about what’s happening.

gparted-apply

  • Once the operations are complete, click close.

gparted-done

  • Reboot the server and remove the CD.  Your system will run a check disk on C:\ (and maybe D:\). Let it complete and allow the system to boot to windows
  • When your system boots up, open Disk Management and view the newly sized C:\ and D:\. Note the unallocated space still on the end of the drive. Also note, D:\ no longer has a drive letter. Reassign the same drive letter.

diskmgmt-unallocated3

  • Now Run dis part and extend the volume.
  • Enter #List DISK
  • Enter #LIST VOLUME
  • Enter #SELECT VOLUME #
  • Enter #EXTEND. This will take all available space and use it to extend the partition.
  • Reboot the server and allow for another check disk to run. This time it will be for the D:\ drive. Depending on the size of the drive, this may take some time.
  • Once the server reboots, open up disk management and review the disk layout.

diskmgmt-done

Adding AD Users and Computers to Windows 2008R2

I’m human. Someone asked me how to get to Active Directory Users and Computers (ADUC) on a 2008 R2 and my first response was, look under Administrative Tools.  Well, as luck would have it, it’s not there. Where is it, MMC? admintools? adminpak?  I wasn’t sure. This is a new server and not under my purview so I just assumed it was there.   Sometimes I think I’ve forgotten more that I remember, but then, It dawned on me, this is 2008R2 and EVERYTHING is either a role or a feature.

Problem

How to add Active Directory Users and Computers to a Windows 2008 R2 Server

Solution

  • Launch Server Manager
  • Click on/Expand Features
  • Click Add Features
  • Scroll down and expand Remote Server Administration Tools
    • Expand Role Administration Tools + AD DS and AD LDS Tools
    • Select AD DS Snap-Ins and Command-line Tools

    Add Remote Server Administration Tools

  • Click Next. Confirm installation selections and Click install.
  • Click Close when the installation succeeds.

aduc-installed


Social media & sharing icons powered by UltimatelySocial