Category: Storage

Connect Drobo B800i to CentOS 7 via iSCSI

Drobo Dashboard
CentOS 7.4.1708 Kernel 3.10.0.-693.11.1.el7.x64_86
Drobo B800i Firmware 2.0.6

The Drobo and the host computer must be on the same subnet in order for this to work. (See Drobo Online User Guide)
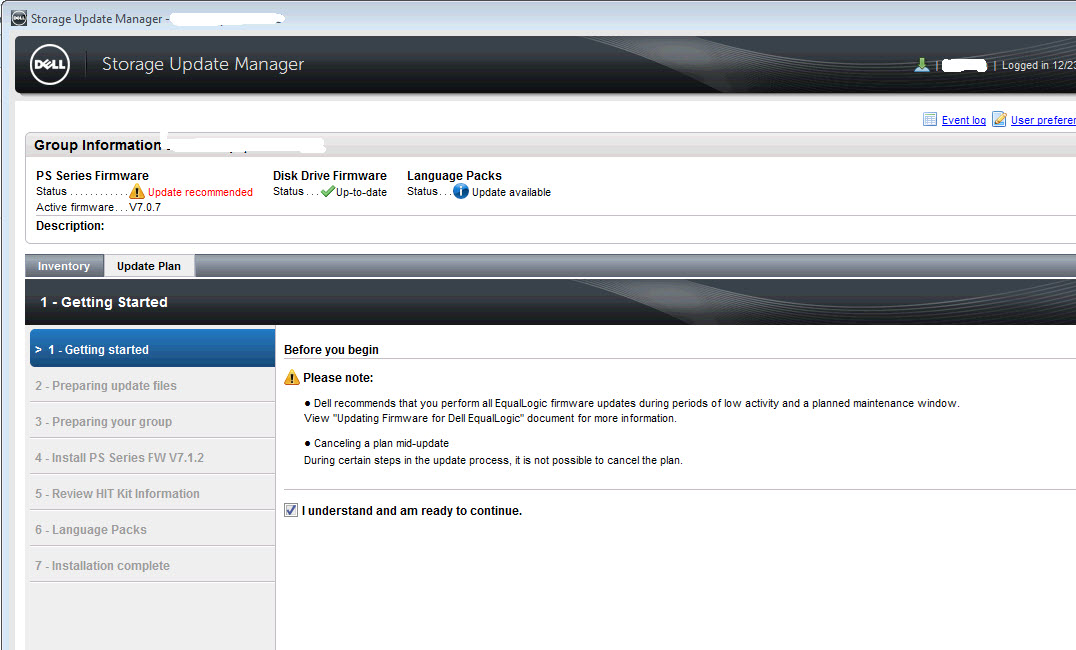
Preparation

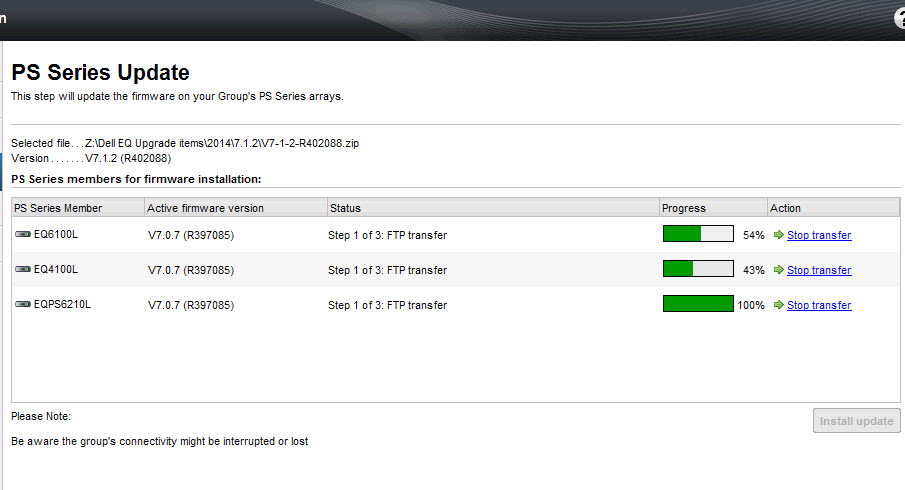
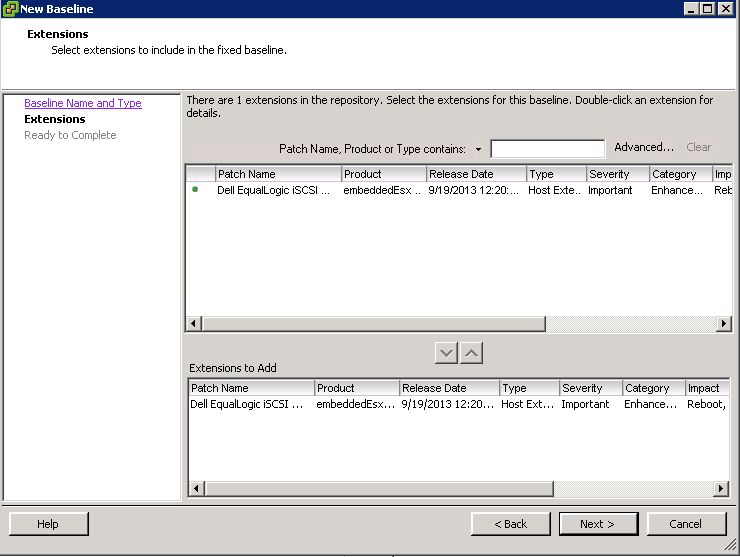
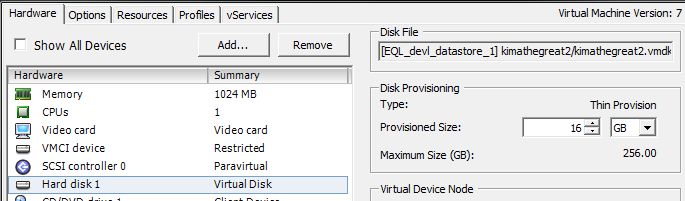
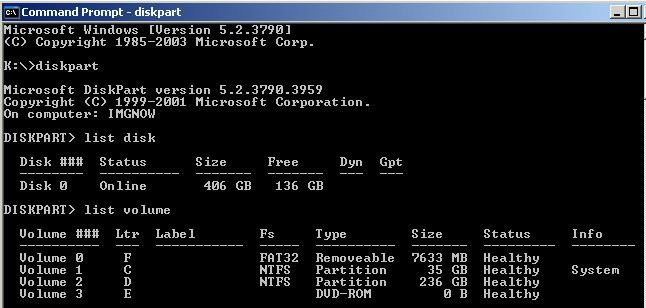
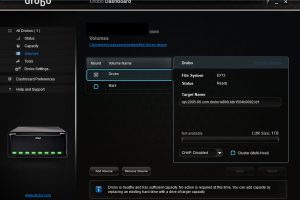
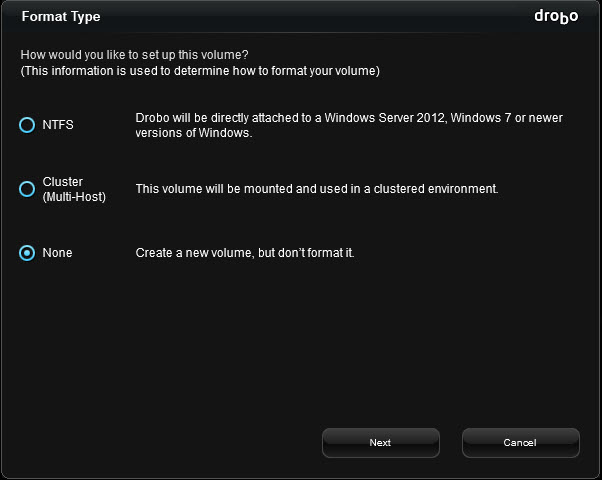
After configuring the device’s IP and other settings via USB from my Windows desktop using Drobo Dashboard, I created a 1TB, unformatted volume.

Format Dialog box

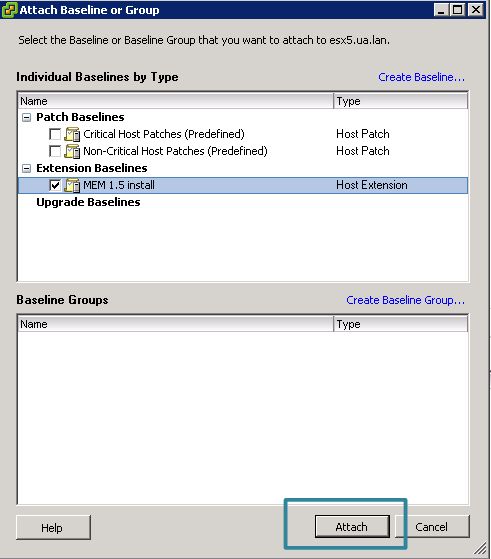
Information you’ll need to connect to machine:

  • Target Name
  • IP address of device

I did not enable CHAP, but it can be easily configured on the machine. I also disabled SELinux on this test box.

**note** your Drobo must be on the same subnet as your server.

I installed the iscsi initiator utilities.

$ sudo yum install -y scsi-target-utils

Configure the server

On the CentOS server, install the iscsi package

# yum -y install iscsi-initiator-utils

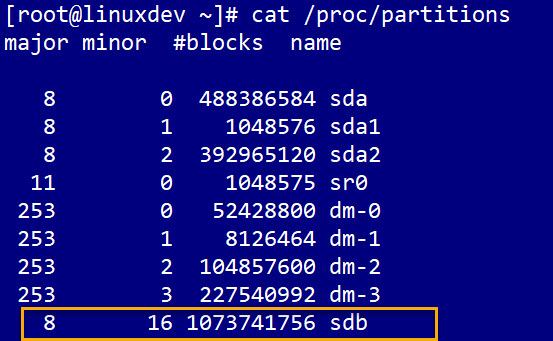
List out the /proc/partitions file to see the devices that you have currently. Once you login to the iSCSI volume, a new one will appear and that’s the one we’ll format.

# cat /proc/partitions

Add the target name to /etc/iscsi/initiatorname.iscsi file, save and exit.

#  vim  /etc/iscsi/initiatorname.iscsi
InitiatorName=iqn.2005-06.com.drobo:b800i.tdb1504b0092.id1

iscsiadm discovery command

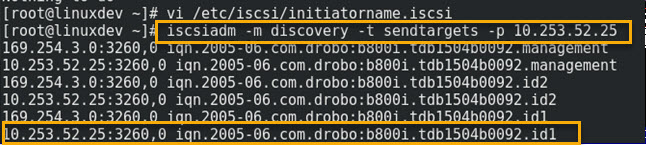
Use the iscsiadm command to discover the target.

# iscsiadm -m discovery -t  sendtargets -p 10.253.53.25

Once your volumes are discovered, you can login to them

# iscsiadm -m node -T iqn.2005-06.com.drobo:b800i.tdb1504b0092.id1 -p 10.253.52.25 --login

List out the /proc/partitions file to see the new disk.

# cat /proc/partition


Command to display partitions

command to login the iscsi target

If the login is successful, run the dmesg | tail command to see if the kernel sees the logical blocks.

# dmesg | tail

Time to partition the device. 

Run the parted command against the device to create a new disk label. Run It again to create the primary partition

# parted --script  /dev/sdb mklabel msdos
# parted --script  /dev/sdb mklabel primary 0% 100%

If by chance you get an error that reads:

Warning: The resulting partition is not properly aligned for best performance

Read this blog post and make the adjustments. 2048s is a good choice for the starting sector.

Check the disk alignment

# parted /dev/sdb align-check optimal 1

If it returns 1 aligned, you’re good to go.

Format your disk

# mkfs.ext3 /dev/sdb1

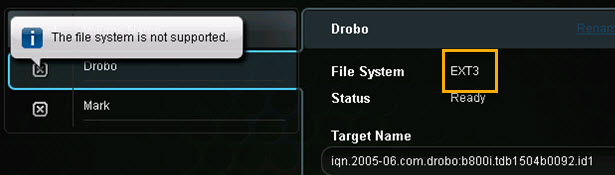
*note* I’d read that this Drobo didn’t support ext4 and after formatting the volume, I found that to be false.

Mount your disk

# mount /dev/sdb1 /drobo

Confirm that you can write to it

# touch /drobo/testfile

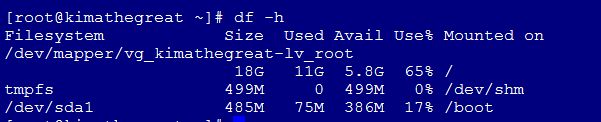
Check the  file system disk space usage.

# df -hT

*Notes & Caveats*

  • All volumes on the Drobo were ‘visible’ in file manager. If you have multiple volumes on the target, you’ll see them all in GUI file manager.
  • They have a different name after each reboot /dev/sdb1 or /dev/sdc1,
  • Adding it to /fstab didn’t matter, since the name changed after every reboot.
  • They show as ‘on my computer’ and when I click on the drive, it mounts to /run/media/username/some-really-long-number-and-series-of-letters. The media directory isn’t even present  under the/ run director after a reboot. It only appears once I click on the disk in the file manager.
  • I’ve read a few blogs where it’s better to present the Drobo as 1 large volume to a Linux system.
  • I formatted it as ext3 just fine. I’d read in another blog that it doesn’t support ext4. I didn’t find a definitive answer in the online guide to confirm or deny it until I saw the above mentioned alert in the dashboard.

You can set the target to login and mount at boot by editing the /etc/fstab and by using the iscsiadm command to set it to automatic.


Deprecated VMFS volumes found on the host Warning on ESXi after adding a datastore with Dell VSM

I’m running ESXi version 6.1 U1 and Dell Virtual Storage Manager  (VSM)version 4.5.2.974. I added a datastore to  the cluster using VSM and on 2 of my hosts I got the following alert:

vsmversion

deprecatedvmfs

Enables SSH on the host and check out the logs.

In /var/log/hostd.log , I found the error:


 warning hostd[xXxXxX] [Originator@6876 sub=Hostsvc.DatastoreSystem opID=123456-789-abc-def user=vpxuser] UpdateConfigIssues: Deprecated VMFS filesystems detected. These volumes should be upgraded to the latest version.

When I created the datastore, I did select VMFS 5, so I wasn’t sure why this error appeared.

selectedvmfs5

According to vmware KB2109735, this is a known issue in version 6.0 and there is no resolution. Just restart the management services and the message goes away.


#  /etc/init.d/hostd restart
#  /etc/init.d/vpxa restart

Then the message goes away.


*note*

This only happens to me when I create a datastore with VSM. If I present a disk from my array, set up the iSCSI connections and rescan, I don’t get this message. Your mileage may vary.

Updating the Drive Firmware on EqualLogic arrays

When you’re updating the firmware on EqualLogic arrays, this is also a good time to update the firmware on the hard disks as well. Check the recommended hard disk drive firmware on the eql support site (login required). Compare your hard drives revision number against the ones listed under the ‘affect hard drives’ section of the page. Open either group manager or San HQ and review the current firmware revision.

Confirm current drive firmware version

In group manager, Group + Members + Array + Disks tab.

version of your disk drives

In SanHQ, Default Server + Select Group + Hardware /Firmware + Disks

disk_fw_list_sanhq

If you find your disks drives require a firmware upgrade, plan to update.

FTP the firmware update to the array

Download the firmware update kit from the EQL support site.  FTP to the array.  Here is an example:

Open the connection to the array via IP or hostname and log in with an account that has admin privileges, like grpadmin.

Change to binary mode and ‘put’ the kit_vxxxx_DriveFW_xxxxxxxxxx.tgz file on the array. Once the transfer is complete, close and bye.

ftpupL

Run the update

Now, SSH into the array and begin the update.

Type ‘update‘ and confirm that you’d like to proceed with the update.

update

Depending on the number of drives in your array, this will only take a few minutes.

update-done

yes

Confirm new firmware version

Check group manager or SAN HQ and confirm your new hard drive firmware version.

newfw-sanhq newfw-group


Updating the firmware on Dell EqualLogic arrays with Dell Update Storage Manager

The Dell Storage Update Manager (DSUM) is a great new tool that makes updating your array firmware, drive firmware  and language packs easier. Launched summer 2014, this application that can be installed locally or ran remotely via a java based app, is your new recommended way to update your groups.  To use it, you must be running at least v5.0.0 PS series firmware or FS series firmware 3.0.0 or higher.  This wizard will walk you through assessing the current state of your groups and guide you through the updates step by step.

To download the application, login to your EQL support account. Also, download your firmware, disk drive firmware and your language packs (if applicable). To run the java web app, follow this link

http://psonlinehelp.dell.com/dell-storage-update-manager/

and open with Java web start launcher.

launch java app

Log into your group with administrative credentials.

Dell Storage Update Manager Login

Once logged in, you can review the status of your group firmware, disk drive firmware and language packs.

group inventory overview

Click on Update plan to being the update wizard.

selectupdates

Here is where you select the updates to be installed.

update plan summary

Review  the updates you’ve selected. The Update plan summary will give you an estimated time for the updates to completed.

Getting Started

On the getting started screen, you’ll get a quick reminder to perform the update when their is low activity and during a pre-planned maintenance windows.  Check the box to confirm you understand the ramifications.

Preparing your update files

Upload the files needed to update your array, drives, and language packs.

Prepare your group

The app will review if their are any issues detected on your group that may prevent updates from running. Some issues that may prevent an update are:

  • RAID is in a degraded state
  • There are active errors or warnings in the log file
  • There are disk errors or issues
  • Controller issues
  • Space issues
  • High I/O
  • Replication is occurring
  • Volumes are migrating

Install Updates

The next screen in the wizard is the 1st step in updating your array’s firmware. Review the information and click install update.

The installation begins and will display the progress  and the current status. you can also review this information in group admin under group operations.

  • The 1st step is the FTP transfer of the zip file to the array.
  • The 2nd step is the actual update.
  • The 3rd step is the update pending restart.

step1

step2

step3

Once the update is complete and pending a restart, click ‘restart’ to proceed.  You’ll be  warned about the restart and it’s ramifications. Repeat for each array.

restart

complete

The update is complete. The HIT Kit compatibility screen with remind you to confirm that all EqualLogic software in use in your environment  is at the versions listed.

hit

Follow the subsequent prompts for updating the drives and language pack (if aplicable)

Once all installs are done, you’ll get the ‘installation complete’ screen that summarizes what took place.

installcomplete

update successful

EqualLogic Cloning an Inbound Replica

I have a dev server that’s my sandbox for VMware VCA studying. This Dell PowerEdge 2900 is on it’s last leg. It has an iSCSI disk that houses a bunch of ISOs, installers, docs, etc that is being replicated to another EQL array. The old PE is located behind my desk and is loud as a 747 taking off when it powers up.I will NOT miss this thing at ALL!

I have a new PowerEdge R420 that I’ve moved my development environment to and it lives in an offsite data center. I want my iSCSI disk attached to my new server, but I don’t want to stop replication on my current disk until the server is wiped and hauled off. The beauty of EqualLogic is their arrays are wonderfully easy to administer and makes any takes relatively easy.

Since the disk is replicated and I don’t want it to stop replicating right away, but still would like to have the current data to use and access immediately on my new server. Yes, I could have mapped a drive, but if the 2900 dies, I’m still up and running without even a hitch.

That’s where cloning an inbound replica comes in.

From the outbound group manager, make sure you’ve replicated your volume.

confirm_volume_replicated

From the inbound group manager, Go to replication and expand inbound replicas. Select your replica so the information appears in the right pane. Click clone replica.

clone_replica

The wizard will guide you through the process of cloning your replica. On step 2, change the snapshot reserve if you need to. Step 4, review the summary and click finish.

change_snap_reserve

finish_clone_replica

Your new volume will appear in the volume list. Present it to the new server if you didn’t during the clone volume replica wizard and you’re in business.


new_vol


Configure and Install the Multipath Extension Module for vSphere and EqualLogic

The MEM (Multipath Extension Module)  by EqualLogic (EQL) handles path selection and load balancing to the storage array. Upon install, it will add another path selection policy called ‘dell_psp_eql_routed’ in addition to the 3 default policies. Using this PSP is ideal when you’re datastores reside on EQL since the module is written by EQL, it has been designed to perform more efficiently in regards to path selection and load balancing to the array.

Here is how I installed and configured MEM on my esxi hosts. I’m running ESXi 5.1 Update 1 with vSphere CLI installed on vCenter.

Prerequisite: Be sure to configure an iSCSI vSwitch for multipathing before installing MEM. Please read  TR1075 for more information on how to configure the vSwitch.

Download MEM from EQL support site. Login is required. Review the release notes, TR1074 as well as the installation & user guide before proceeding.

On the vCenter server,  launch vCenter client. From the home screen, open Update Manager and click on the patch repository tab. Click import patches and browse to the MEM offline bundle zip  and click next to upload.

import-mem-offline-bundle

browse-mem

upload-mem

Next, create a baseline. Enter a name and description for your new baseline, select ‘Host Extension’ then click next.

newbaseline1

Add the extension to the baseline. Click next.

newbaseline2

Review your  setting and click finish.

newbaseline3

Your newly created baseline is now listed under the Baselines and Groups tab.

baseline-and-groups

Now it’s time to install. Begin by putting your host into maintenance mode.Click the update manager tab of the host and click attach.

attachbaseline

Check the box next to the MEM install and click attach.

attachbaseline2

Highlight the attached baseline and click scan.
scanhost

Confirm that you’re scanning for patches and extensions. Remove the check next to upgrades. Click scan.

confirmscan

The host will now be labeled as non-compliant. Click remediate in the lower right corner.

remediate

Click next twice in the remediate wizard if you’re accepting the defaults. On the schedule window, type in a new task name and description (optional) and select a remediation time. I did mine immediately, but this task can be scheduled for a later time. Click next.

remediate-sched

Edit any host remediation options and click next. Edit any cluster remediation options and click next. Review your remediation settings and click finish.

review-remediate

Monitor the recent tasks pane to see the status of the installation. Upon completion, the host will be listed as compliant in the update manager tab.

compliant


Reboot.

From a system with vMware vSphere CLI installed on it, run the following command to verify the MEM installation. You will need the setup.pl script in order to run it. It’s included in the MEM download.

Enter the following command using your esxi hostname or IP:
# setup.pl --server=esxhostname_or_IP --query

Enter the credentials for the host. After a few moments, the command will display the version of the MEM installed, the default PSP that is now set as well as the vmkernal ports used by MEM.
verifymem

To list the new Dell EQL PSP as well as the defaults, use the following command:

# esxcli --server esxhostname_or_IP storage nmp psp list

Enter the credentials for the host.
listpsps

Multipathing is available immediately after installation. You can see the paths to the disk as well as the new PSP. On the host, go to the configuration tab+ hardware+storage+right-click the datastore + properties+ managed paths.

after-paths

This is what it looked like before the install:

before-paths

Here you can see that there were 2 active connections to each controller, however, only 1 was being used for I/O. Once MEM is installed, there are redundant active connections to each controller and the load is more evenly balanced.

As I mentioned before, the MEM is totally functioning, however, in order to use the new esxcli commands that are available to manage and report on, you’ll have to restart the hostd agent on the esxi host.

Enable SSH on your host and log into it.

Restart the hostd service:

# /etc/init.d/hostd restart

restart-hostd

The new commands are now available. To list them:
# esxcli equallogic

eql-cmds

Log out of the host and disable SSH.

Done!
For more information on Dell’s MEM, read this great blog post from Cormac Hogan of vMWare.

Grow (Extend) an LVM on a Linux VM

We’ve all been there, you’re running an app on a VM and you see that it is quickly running out of free space. Since we’re not constrained by any physical limitation, we can just allocate more space to the guest and grow the disk.

As with any hard drive partitioning, make sure you back up any critical data. Since this is a vm and I’m running VDR, I can run a quick backup and begin. Also, remove any snapshots if you have them.

Power down the VM. Add space to the hard disk under Edit Settings.

Edit Settings on the VM

Power the VM back up  and  run a  # df -Th  to see the current disk usage & filesystem type.

df -h output before growing the disk

Run  # ls -al /dev/sda* to view all the disks

fdisk /dev/sda

:n (new disk)

:p (create primary partition)

:3 (the partition number)

: first cylinder  (keep the defaults)

: p (print the partition table and review the new partition on /dev/sda#)

:w (write the table to disk and exit)

# reboot the server or run  # partprobe . If partprobe throws an error, just reboot. This is to make sure the partition table is actually written.

Run  # vgdisplay to view the volume group. In the FREE PE / Size section, you will see that there isn’t any free space yet. Take note of the proper name of the volume group.

Output from vgdisplay

Run a  #vgextend vg_insertyourvghere /dev/sda#

Do another #vgdisplay to confirm the free space on the volume group.

freespace

It shows you there is now 4GB free space that can be added to the volume group.  Now we extend the logical volume into that free space

Do an #lvdisplay to get the proper name of the logical volume you’re going to extend.

Now, time to extend the logical volume group.

#  lvextend -L +4G /dev/vg_kimathegreat/lv_root

lvextend

I reduced the size slightly to avoid the error about  “Insufficient free space”.

Now to resize the file system. If this is a partition that can be unmounted, run a # umount before running resize2fs.

#resize2fs /dev/vg_kimathegreat/lv_root

Run df -h to see the new size of the partition and the increased free space.

newfreespace

Now, there are a few caveats I’ve run across. Mainly when running fdisk /dev/sda. I will allow me to make a partition, but depending on where the sectors start and end, I won’t be able to run a pvextend.

If that happens, run # cfdisk and see where the partitions are and if you have any free space. If you do, that is where you create your partition.  You can make your corrections, between both fdisk and cfdisk , by deleting the small partition and creating a new one with the larger chunk of free space.  Just be careful and don’t delete anything critical.

As you can see, I’m missing sda3. That was because the 1st fdisk /dev/sda created a partition using only a few megs of space. I didn’t note the sector count and created the primary partition in the smaller block of free space. I used fdisk  (d) to delete that partition and then created a new one.

missingsda3

Adding space to a vDisk on a PERC 5/i Controller Part 2 of 3

To Grow the D:\ Drive

This is part 2 of the “Adding space to a vDisk on a PERC 5/i Controller” post.

Back to Part 1

  • Launch diskpart from the command prompt.  #diskpart (enter)
  • It opens in another window.  Enter  #LIST DISK (enter) and review the disks of the server.
  • Enter #LIST VOLUME   (enter) to view the volumes. Note the volume numbers next to the drive letter.  You will select the volume that you would like to grow.

diskpart-listvolume

  • #LIST PARTITION (to view the partitions)

diskpart-listpartition

  • Enter #SELECT DISK # (the number of the volume you’re growing). This is to bring focus on the disk that you’re working with. OR
  • Enter #SELECT VOLUME 2 (the D:\  is what we’re growing so we will have enough space to ‘give’ to C:\)
  • Decide on the size that you’d like to grow the disk by (in MB). In this example, we grew the disk by 100GB. Enter #EXTEND SIZE=100000 (100GB~)
  • You’ll see the success message immediately  following.
  • Enter #LIST VOLUME (to review the size of the new volume.  It will have an asterisk beside it)

diskpart-extend

  • Enter #LIST DISK to view the available space on the vDisk.

diskpart-listdisk-done

  • Enter #EXIT to close diskpart.
  • Go back to disk management and view the size change of D:\ and the unallocated space.

diskmgmt-unallocated2

Next Step: Growing the C:\ Drive

Social media & sharing icons powered by UltimatelySocial