Category: Linux

How to reset lost or forgotten MYSQL password

List of sql fields in user table

My system is as follows:

  • Ubuntu 16.04.4 LTS
  • Mysql 5.7.22

Stop the mysql process:

sudo /etc/init.d/mysql stop

Use mysqld_safe using the –skip-grant-tables option to start the process:

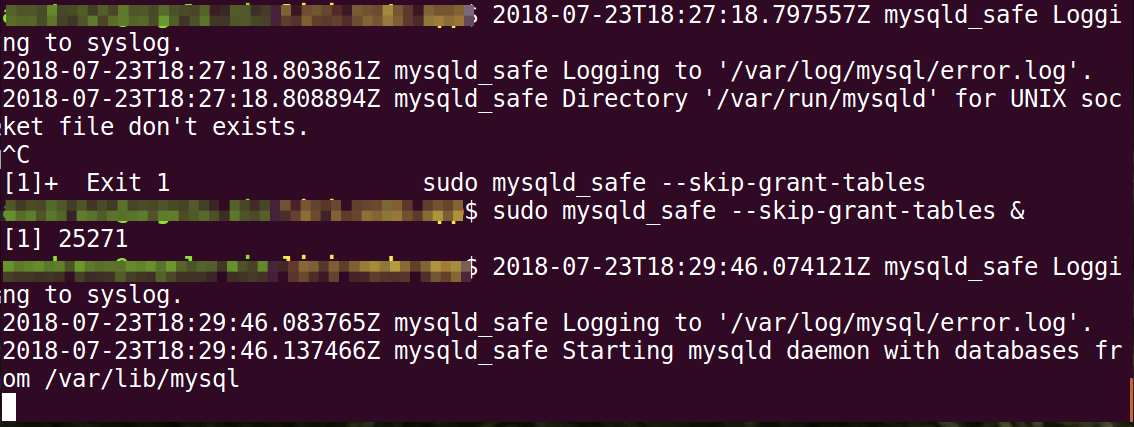
sudo mysqld_safe --skip-grant-tables &

If you get an error about: mysqld_safe Directory ‘/var/run/mysqld’ for UNIX socket file doesn’t exist, check 2 things.

  1. If you have a /var/run/mysqld directory, if not, make one and change the permissions with chown.
  2.  In the /etc/mysql/ directory, there is a file called, my.cnf open it and add the following:
sudo chown mysql:mysql /var/run/mysqld
[mysqld]
port=3306
socket=/var/run/mysqld/mysql.sock

Save and close this file and re-run sudo mysqld_safe –skip-grant-tables &

You should see a message that reads: mysqld_safe Started mysqld daemon with databases from /var/lib/mysql

Output from mysqld_safe command

Open another terminal and log into mysql

mysql -u root

Now you can reset your password. Run these commands:

mysql> use mysql;
mysql> UPDATE user SET password=PASSWORD('pass123') WHERE user='root';
mysql> FLUSH PRIVILEGES;
mysql> quit

If you get an error when running the UPDATE user command that reads: ERROR 1054 (42S22): Unknown column ‘password’ in ‘field list’, do this next.
Assuming this is for the mysql database:

mysql> use mysql;
mysql> show tables;

List of tables in mysql
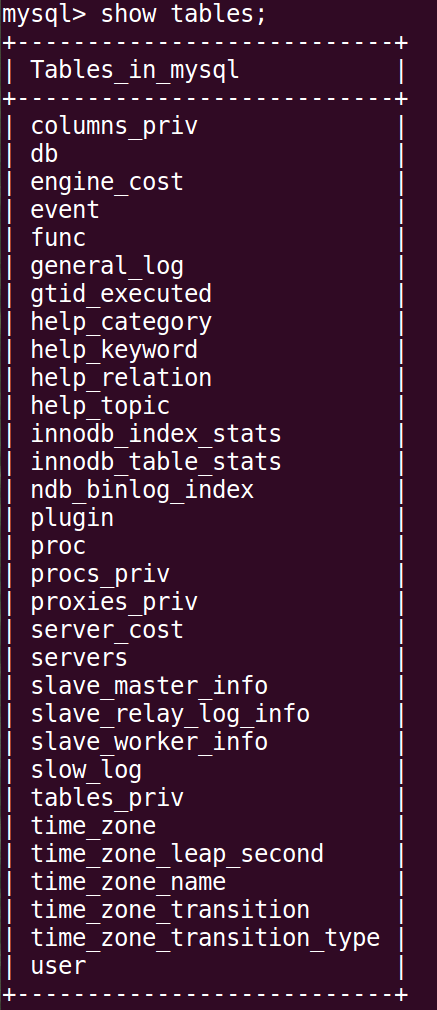
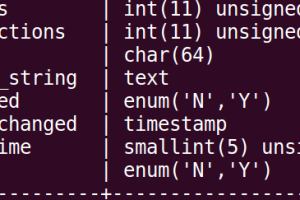
If you don’t see a row called password, but there is a user field, run this:

mysql> describe user;


List of sql fields in user table

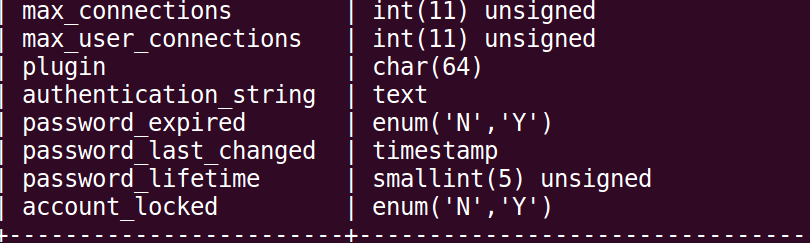
There is a row called ‘authentication_string’ that holds the password.

You will need to run this command to reset the password. Just like the command above, but referencing the correct field in the user table.

mysql> use mysql;
mysql> UPDATE user SET authentication_string=PASSWORD('pass123') WHERE user='root';
FLUSH PRIVILEGES;
quit

Log back in and test your new mysql password

 mysql -u root -p

Configure logrotate on a specific log file

There is a log file that I only want to keep 4 days worth of logs for.  Here is how you configure logrotate to rotate logs to your specific needs.

Logrotate is a system utility that rotates, compresses and mails system logs as needed on your Linux system.  Located in /etc on RHEL based systems, it has default parameters set for certain files, but also allows for you to chose your own files to be rotated, as needed. To configure /var/log/slapd to rotate logs daily and only keep them for 4 days, here are my steps.

Switch to root and vi /etc/logrotate.conf

~ ] # vi /etc/logrotate.conf

At the bottom of the file, there is a section where system-specific logs can be configured for rotation. G$ to get to the end of the file and i for insert. Make a new line and enter the path to the file with opening and closing bracket to  place your rotation parameters.

Screenhost of logrotate.conf

  • missingok means that if the file is missing, go to the next one and don’t throw an error.
  • notifempty means that the file shouldn’t be rotated if it’s empty.
  • maxsize is the max size the file can get before it’s rotated. 20M is the size of the file in megabytes.
  • daily means the log file will be rotated every day.
  • create  0644 root root means that log file that is rotated, a file will be created with 0644 mode set on the file. The owner and group on the rotated file will be root.
  • rotate 4 means that the log will be rotated 4 times before it’s removed from the system.

Close the file, :wq! and run logrotate to see if it’s working.

~ ] # logrotate -v /etc/logrotate.conf

I used the -v switch to see the verbose output of the command.

Output of running logrotate

The output tells you what is happening during the running of the command. It runs against the slapd file and lists the rotation schedule, then says it won’t run against empty files and that old log files will be removed. The file is rotated and a suffix is appended to the old log file. It lists the glob pattern (it resembles regular expressions, but much simpler ) and looks for old files to delete. As you can see, there were none.The file is renamed and a new file is created with the mode you stated. I list the files and as you can see, the file has been rotated and a new, blank is ready for the days logs.

The man pages for logrotate and logrotate.conf are very helpful in this case. Be sure to read them to see how many options you can use to configure your logs to rotate.


Changing Runlevels in RHEL 6.x and 7.x

Most of my servers are running RHEL 6.9, but some are running 7.4 and one has xwindows installed. Changing the runlevel is different now.

To check the current runlevel in RHEL 6.X:

# runlevel

To disable the GUI at boot-up in RHEL 6.x:

 # vi /etc/inittab

Edit /etc/inittab and change the line id:5:initdefault  to id:3:initdefault

Save the file and reboot to confirm.

To check the current runlevel in RHEL 7.X:

#  systemctl get-default

To disable the GUI at boot-up in RHEL 7.x:

 # systemctl set-default multi-user.target

Save the file and reboot to confirm.


Connect Drobo B800i to CentOS 7 via iSCSI

Drobo Dashboard
CentOS 7.4.1708 Kernel 3.10.0.-693.11.1.el7.x64_86
Drobo B800i Firmware 2.0.6

The Drobo and the host computer must be on the same subnet in order for this to work. (See Drobo Online User Guide)

Preparation

After configuring the device’s IP and other settings via USB from my Windows desktop using Drobo Dashboard, I created a 1TB, unformatted volume.

Format Dialog box

Information you’ll need to connect to machine:

  • Target Name
  • IP address of device

I did not enable CHAP, but it can be easily configured on the machine. I also disabled SELinux on this test box.

**note** your Drobo must be on the same subnet as your server.

I installed the iscsi initiator utilities.

$ sudo yum install -y scsi-target-utils

Configure the server

On the CentOS server, install the iscsi package

# yum -y install iscsi-initiator-utils

List out the /proc/partitions file to see the devices that you have currently. Once you login to the iSCSI volume, a new one will appear and that’s the one we’ll format.

# cat /proc/partitions

Add the target name to /etc/iscsi/initiatorname.iscsi file, save and exit.

#  vim  /etc/iscsi/initiatorname.iscsi
InitiatorName=iqn.2005-06.com.drobo:b800i.tdb1504b0092.id1

iscsiadm discovery command

Use the iscsiadm command to discover the target.

# iscsiadm -m discovery -t  sendtargets -p 10.253.53.25

Once your volumes are discovered, you can login to them

# iscsiadm -m node -T iqn.2005-06.com.drobo:b800i.tdb1504b0092.id1 -p 10.253.52.25 --login

List out the /proc/partitions file to see the new disk.

# cat /proc/partition


Command to display partitions

command to login the iscsi target

If the login is successful, run the dmesg | tail command to see if the kernel sees the logical blocks.

# dmesg | tail

Time to partition the device. 

Run the parted command against the device to create a new disk label. Run It again to create the primary partition

# parted --script  /dev/sdb mklabel msdos
# parted --script  /dev/sdb mklabel primary 0% 100%

If by chance you get an error that reads:

Warning: The resulting partition is not properly aligned for best performance

Read this blog post and make the adjustments. 2048s is a good choice for the starting sector.

Check the disk alignment

# parted /dev/sdb align-check optimal 1

If it returns 1 aligned, you’re good to go.

Format your disk

# mkfs.ext3 /dev/sdb1

*note* I’d read that this Drobo didn’t support ext4 and after formatting the volume, I found that to be false.

Mount your disk

# mount /dev/sdb1 /drobo

Confirm that you can write to it

# touch /drobo/testfile

Check the  file system disk space usage.

# df -hT

*Notes & Caveats*

  • All volumes on the Drobo were ‘visible’ in file manager. If you have multiple volumes on the target, you’ll see them all in GUI file manager.
  • They have a different name after each reboot /dev/sdb1 or /dev/sdc1,
  • Adding it to /fstab didn’t matter, since the name changed after every reboot.
  • They show as ‘on my computer’ and when I click on the drive, it mounts to /run/media/username/some-really-long-number-and-series-of-letters. The media directory isn’t even present  under the/ run director after a reboot. It only appears once I click on the disk in the file manager.
  • I’ve read a few blogs where it’s better to present the Drobo as 1 large volume to a Linux system.
  • I formatted it as ext3 just fine. I’d read in another blog that it doesn’t support ext4. I didn’t find a definitive answer in the online guide to confirm or deny it until I saw the above mentioned alert in the dashboard.

You can set the target to login and mount at boot by editing the /etc/fstab and by using the iscsiadm command to set it to automatic.


Leveling up skills with Linux Academy

My stand up desk with the Linux Academy Penguin

I haven’t been blogging much, I’ve been busy learning.

I got a subscription to Linux Academy and for the past month, I’ve been immersed in retooling for a skill switch into DevOps. I’ve been using Linux for years, but my goal is not to have a cursory understanding of the OS, but to be as comfortable in it as I am in Windows. I’ve gotten a few successful completions on a few courses on Linux Academy under my belt. I’m currently in the Linux, Cloud, and Ruby Coding learning path which consists of:

  • Linux Essentials Certification (done)
  • CompTIA Cloud Essentials Certification (in progress)
  • AWS Certified Solutions Architect – Associate
  • OpenStack Essentials
  • Nginx And The LEMP Stack
  • Introduction To Ruby Programming Language On Linux

Linux Academy Completion Certificate- Linux Essentials Linux Academy Completion Certificate- DevOps Essentials

I’ll sit for the LPI Linux Essentials exam this month and move on to the AWS Certified Solutions Architect-Associate exam after that.

In the meantime, I’m writing 2 blog series that will highlight some of the tools, commands, packages that I come across in my studies. Today’s 10 will highlight 10 commands, tips, tricks, etc. The other, Fab 5 will cover 5 quick hitters about Linux.

Stay tuned for more posts about my DevOps journey.


Today’s 10 Commands: Command-Line Navigation

Introducing 2 new blog series: Today’s 10 & Fab 5

This is the first of many blog posts about commands, utilities and tips I’m either learning for the first time or re-familiarizing myself with. This series is called Today’s 10, 10 commands, tips, tricks, etc. I will have another series called Fab 5 for the quick hitters that I come across.

Command-Line navigation:

We all have done it, backspaced and back and forth, arrow up and down the command line. Trying to correct errors, change things after an erroneous tab completions and make changes to command after we’ve pulled them up in our history.

Here are 10 commands that will have you zipping around the shell prompt in no time.

  1. Alt+b – will move your cursor back one word at a time to start of the word.
  2. Alt+f – will move your cursor forward one word at a time to the end of the word.
  3. Alt+d – will delete to the end of that misspelled word starting at the cursor.
  4. Ctrl+e – move your cursor at the end of the line.
  5. Ctrl+ a – move your cursor to the beginning of the line.
  6. Ctrl+l – clear your screen (clear also will do the trick).
  7. Ctrl +w – deletes from the cursor to the beginning of the word or path.
  8. Ctrl+c – clears the entire line. (yes, THAT ctrl+c) and takes to to a blank command prompt.
  9. Ctrl+f – move cursor forward one character at a time, like the right arrow key.
  10. Ctrl+b – move cursor backward one character at a time, like the left arrow key.

Watch your command-line navigation improve as you use these keystrokes more and more. There are many, many more, but these are the 10 that I use the most.

What are some of your favorite command-line shortcuts?


Master Dead but PID File exists

Users reported that mail stopped being sent from their server.

Tried to test email functionality from the command line.

# echo "Subject: Testing Sendmail from server.domain.com" | sendmail -v admin@domain.com
This is a test
BYE
[ctrl + D]

The message wasn’t sent. I tailed the maillog &  checked the service status:

# tail -n 500 /var/log/maillog
# service sendmail status
master dead by pid file exists

I checked to see if any Sendmail processes were running and there were several.

 ps -ef | grep sendmail

Stopped the service, deleted the master.pid and the lock file and killed all the sendmail processes, then restarted the sendmail service

# service sendmail stop
# rm /var/spool/postfix/pid/master.pid
# rm /var/lock/subsys/sendmail
# killall -9 sendmail
# service sendmail start
# service sendmail status

Tailed the logs, resent the email and it was delivered.

# watch tail -n 20 /var/log/maillog


Social media & sharing icons powered by UltimatelySocial